Define how the portal is presented to customers throughout the returns flow.
Note: This article applies to the Classic portal, a legacy feature that is no longer available for new installations.
Table of Contents
Embedding Your Portal
To embed your classic return portal or tracking portal into a specific page of your website, use one of the following methods.
The same embed script can be used for both your return portal and your order tracking portal. ReturnGO recognizes which portal it is based on the custom URL that you have configured in the dashboard.
Embedding the Portal in Any Page on Your Store
Simply add this line to your theme in the place where you want the portal to appear:
<div id="ReturnGOPortalEmbedding" style="position: relative; display:block; min-height: 600px; background-color: #FFFFFF"></div>
Embedding the Portal in an HTML Page
To embed your portal into an HTML page:
1. Add these lines to the page HEAD section of your new page:
<script src="https://static.returngo.ai/master.returngo.ai/returngo.min.js" defer="defer"></script>
<script type="application/javascript">
    window.ReturnGO = {
        shop: 'shopname.myshopify.com', //Your shop URL
        locale: 'en', //The locale to display
    };
</script>
2. Add this line to the page BODY section where you want the portal to appear:
<div id="ReturnGOPortalEmbedding" style="position: relative; display:block; min-height: 600px; background-color: #FFFFFF"></div>
Embedding the Portal in a SPA (Single Page Application)
For single page applications, you can follow the previous steps for embedding the portal in an HTML page with one additional step:
- Add this line before the js script is added:
window.returnGoCanBeRun = true;
// For example, in a React app, the portal component might look like this:
export default function ReturnPortal() {
  useEffect(() => {

    const script = document.createElement('script');
    script.src =
      'https://static.returngo.ai/master.returngo.ai/returngo.min.js';
    script.async = true;
    window.returnGoCanBeRun = true;
    document.body.appendChild(script);

    window.ReturnGO = {
        shop: 'shopname.myshopify.com', //Your shop URL
        locale: 'en', //The locale to display
    };

    return () => {
      document.body.removeChild(script);
    };
  }, []);

 return (
    <div
      id="ReturnGOPortalEmbedding"
      style={{
        position: 'relative',
        display: 'block',
        minHeight: '600px',
        backgroundColor: '#FFFFFF',
      }}
    ></div>
  );
}
Embedding a Second Portal
Some stores have multiple portals, such as a return portal and a warranty portal. For these stores, we support specifying the portal directly, allowing the hosting of the portal on any web page. This enables more flexibility in managing multiple portals.
When using a custom portal page, you need to provide a shop variable to specify the store. If you have multiple portals, you need to specify the portal as well.
To specify that you are referring to the not-main portal, use the shopname@portalname format in the shop: variable when embedding the portal, instead of just the shop name.
Example: shopname.myshopify.com@Warranty_Portal
Where shopname.myshopify.com is the store URL and Warranty_Portal is the portal name.
Here’s an example of embedding a second portal:
<script

src="https://static.returngo.ai/master.returngo.ai/returngo.min.js"

defer="defer"></script>

<script type="application/javascript">

    window.ReturnGO = {

        shop: 'shopname.myshopify.com@Warranty_Portal', //Your shop URL and portal name

        locale: 'en', //The locale to display

    };

</script>
Note: If the portal name is not specified, the first portal will be used. Ensure the portal name matches exactly as it appears in the portals dropdown.
Portal Position
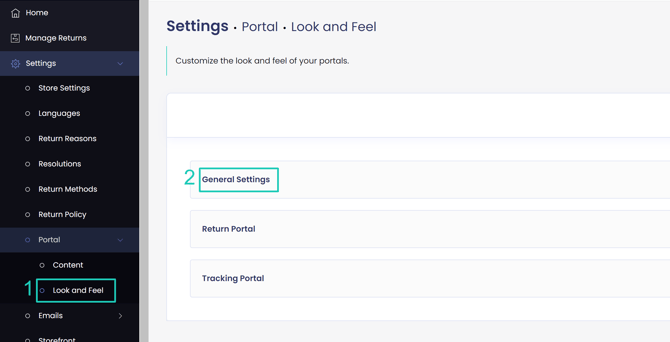
Under the General Settings > General section of the Portal > Look and Feel page, you can define the position of your portal as they appear on the page they’re embedded in.
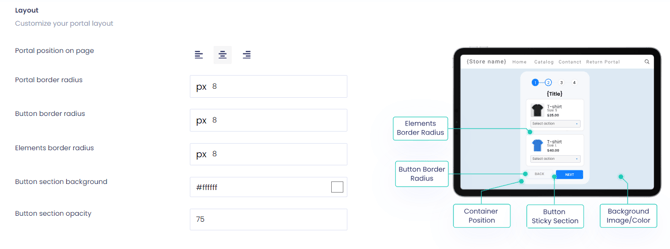
Portal Margins
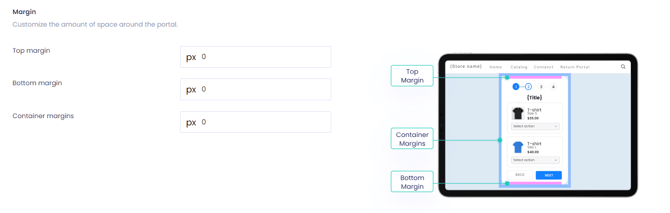
Set the margins you want above and below the portal, as well as the container margins to control the spacing within the portal.
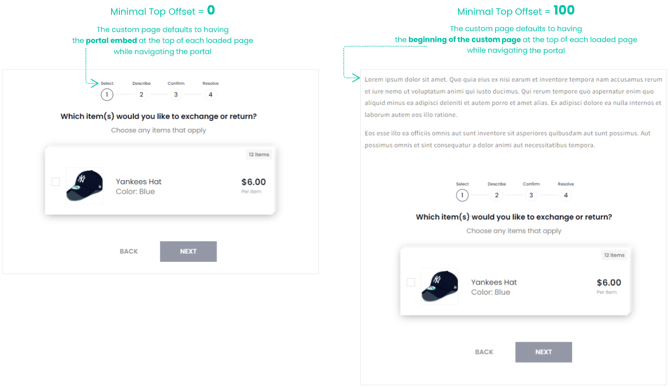
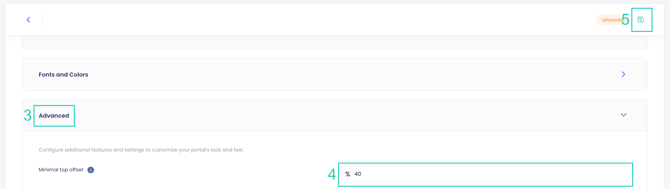
Minimal Top Offset
Specify how the portal will be positioned while navigating through the returns process, especially if there is content above the portal. This setting only applies to portals that are embedded on a custom page.
This lets you adjust the spacing above your portal to make sure it doesn't collide with your banner.
To customize the minimal top offset:
- Go to Portal > Look and Feel.
- Go to the General Settings section.
- Open the Advanced section.
- Set the offset value.
- Click on the save icon to save your changes.
If you set the offset value but nothing changed in the portal, you may be using the default portal page instead of an embedded custom page. Since the default URL does not include any text before the main return portal, there is nothing to offset.
If you have embedded the portal on a custom page, then the issue might be that you’re testing the results on the first screen of the portal, while the effects of the offset can only be seen on later steps of the portal.
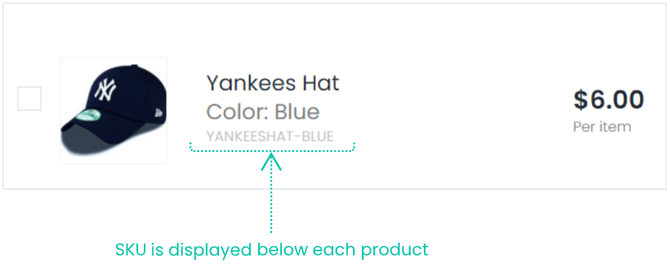
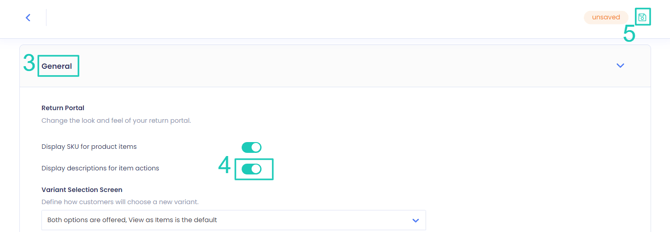
Display SKU for Product Items
Define whether product SKUs will be displayed in the return portal. If you enable the toggle, the product SKU will be visible below each product name on both the item selection and exchange item selection pages of the return portal.
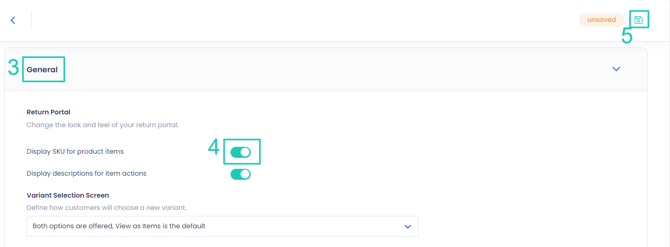
To define whether product SKUs will be displayed in the return portal:
- Go to Portal > Look and Feel.
- Go to the Return Portal Settings section.
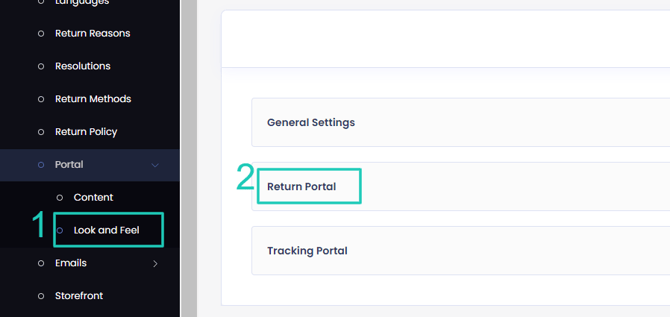
- Open the General sub-section.
- Enable the Display SKU for product items toggle.
- Click the save icon.
Item Actions Descriptions
Define whether to display descriptions for item actions such as refund, exchange for another product, etc.
To define whether to display descriptions for item actions:
- Go to Portal > Look and Feel.
- Go to the Return Portal Settings section.
- Open the General sub-section.
- Enable the Display descriptions for item actions toggle.
- Click the save icon.
Note: You can customize the description texts under Portal > Content under the Return Portal > Select Items section.
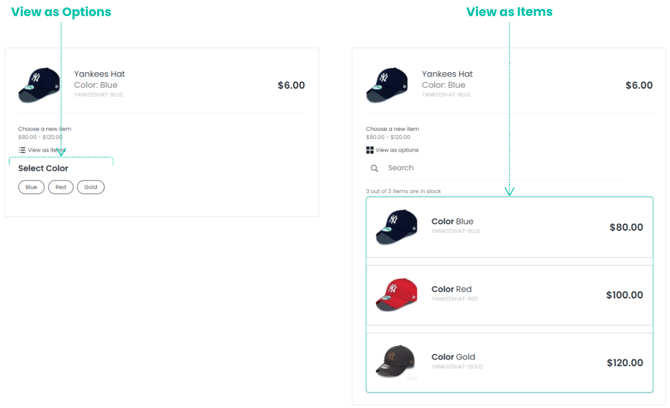
Variant Selection Screen
Define how product variant options are displayed in the return portal, whether as a text list or with details and images. This setting only applies to exchanges.
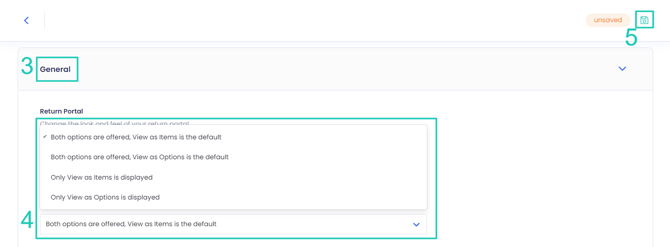
You can set this to one of the following:
- Only View as Items is displayed
- Only View as Options is displayed
- Both options are offered, View as Items is the default
- Both options are offered, View as Options is the default
To define how to display variants:
- Go to Portal > Look and Feel.
- Go to the Return Portal Settings section.
- Open the General sub-section.
- Select your preferred setting under the Variant Selection Screen dropdown.
- Click the save icon.
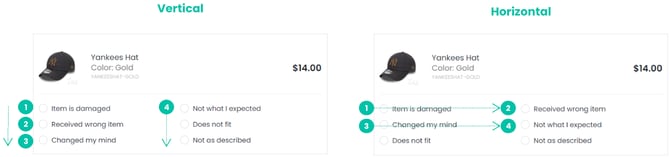
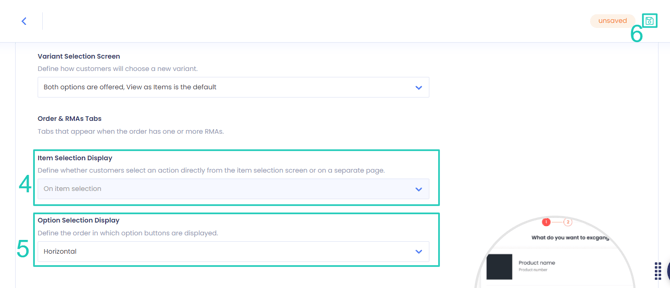
Option Selection Display
Define when the return actions can be selected, as well as the layout of the options in the return portal.
To define how to display the selection options:
- Go to Portal > Look and Feel.
- Go to the Return Portal Settings section.
- Open the General sub-section.
- Select whether you want customers to select an action directly from the item selection screen or on a separate page.
- Select the order in which option buttons are displayed, either vertically or horizontally.
- Click the save icon.
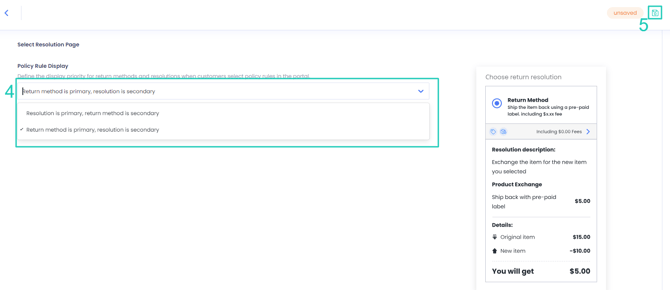
Resolution Selection Display
Define the order that resolutions and return methods are displayed in the portal.
To define the resolution selection screen order:
- Go to Portal > Look and Feel.
- Go to the Return Portal Settings section.
- Open the General sub-section.

- Select the order you want resolutions and return methods to be displayed on the Select Resolution Page of the portal. To the right of the settings, you can see a preview of what the selected configuration will look like.
- Click on the save icon.
SEO Settings
To customize the SEO meta title and meta description of your portal, you need to embed it in a custom page, and then you can configure the page metafields directly in your eCommerce platform.
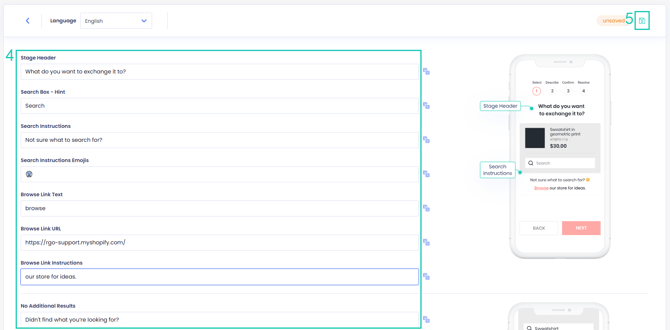
Editing Return Portal Texts
You can customize all the texts that appear in your return portal.
To edit return portal texts:
- Go to Settings > Portal > Content.
- Open the Return Portal section.
- Click on the section you want to edit.
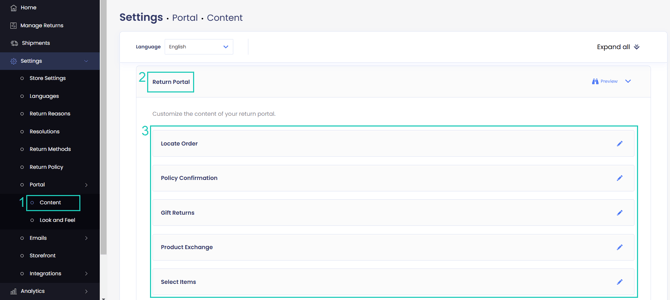
- Customize the text as necessary.
- Click the save icon.
How to Import a Font
The steps to import a font to your theme may vary, but you can try to upload a font file to your Shopify store directly, then use a custom style script to import it to your theme.
Note: You can find the list of font names in your store theme editor, or you can find an element in your store that uses the font that you want, and inspect it to get the font name.
- Download the font from Google Fonts.
- Upload the font in Shopify > Content > Files, then copy the file URL.
- Construct a custom-style script based on the script below.
- Add the custom style script in theme.liquid, just above the </head> element.
- Set the font in Portal > Look and Feel.
Note: If these steps do not work, please consult a web developer for further assistance.
Change the Font for Specific Languages
To change a font for a specific language, add these lines in the Custom CSS box, replacing the language code with the language you want to change, and the replacing font family with your desired font:
#returnGoAssistant .ReturnGO_Popup-module_popup .ReturnGO_Popup-module_wrapper.ReturnGO_Popup-module_alignCenter :lang(he),

#returnGoCartWidget .ReturnGO_Popup-module_popup .ReturnGO_Popup-module_wrapper.ReturnGO_Popup-module_alignCenter :lang(he),

#returnGoAccountWidget .ReturnGO_Popup-module_popup .ReturnGO_Popup-module_wrapper.ReturnGO_Popup-module_alignCenter :lang(he) {

    font-family: Assistant, sans-serif;

}
Note: It is recommended to specify two fonts: the primary font and a fallback font in case the primary one is not supported.