Once a customer submits a return or exchange request through the portal, a Return Merchandise Authorization (RMA) is created. You can manage each RMA directly in your ReturnGO dashboard by reviewing, approving, processing, and completing requests.
Viewing RMA Details
The RMA page provides a comprehensive view of each return request and the tools to process it.
Main Sections of an RMA
- RMA Summary: Displays the RMA number, date, and time of the request, as well as the current status.
- Order Summary: Shows the associated order number (clickable to view order details in your eCommerce store), order status, and fulfillment date.
- Customer Info: Displays the customer’s name, any other open RMAs, store credit balance, transaction history, and shipping address.
- Original Items: List of returned items. Click an item for more details or select items for refunds or restocking.
- New Items: Shows items the customer selected to replace returned items.
- Shipments: Displays tracking details and status updates for returned items, including carrier, service level, labels, QR/barcode, slips, and item count.
- Draft Orders & Pending Payments: View draft or pending exchange orders, invoices, and portal payments.
- Timeline: Chronological log of all activity (automated and manual). You can also add notes directly here.
- Action Buttons Bar: Bottom bar with actions such as Approve, Reject, Mark as Received, Release Exchange, or Mark as Done. Available actions depend on the RMA’s current status.
Review Pending RMAs
When a request is first submitted, the RMA status is Pending request. When an RMA is pending, it is waiting for your review. You can approve, reject, or request additional information from the customer.
To review a pending RMA:
- Go to Manage Returns.
- Click Pending requests or search for the RMA by order number or customer details.
- Open the RMA to review item details, reason for return, and any attached notes or photos.
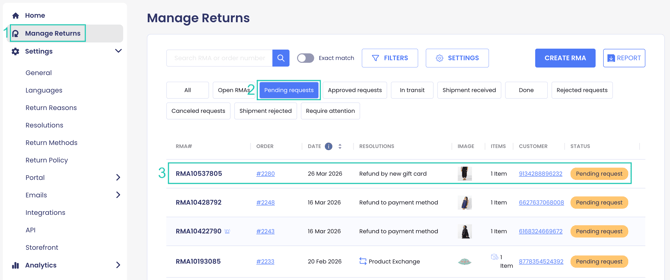
Note: If auto-approval is enabled, eligible requests are automatically approved instead of remaining in Pending request status.
Manually Approve an RMA
After reviewing, you can approve the RMA to confirm the customer’s request and continue the return process.
When you approve the RMA:
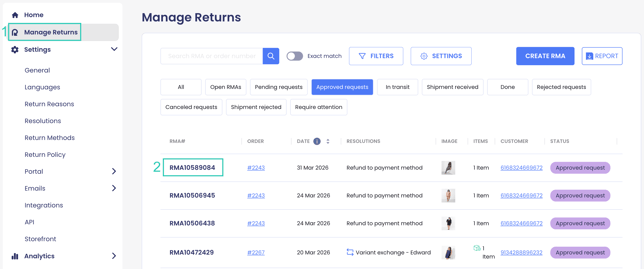
- The RMA status changes from Pending request to Approved request.
- The customer receives confirmation and shipping instructions.
- Fees, if any, such as return label fees, are charged for exchanges or when your settings specify that fees are invoiced separately and not deducted automatically.
- Return labels or instructions are generated according to your setup.
- If the request is an exchange, a new order is created in your eCommerce platform.
- In cases where shipment is not required, the action button changes to Mark as Done.
Note: You can set up auto-approval on the Return Policy page so that eligible requests move directly from Pending to Approved without manual review. If auto-approval fails (for example, if a return label cannot be generated), the RMA remains in Pending for manual review.

To manually approve an RMA:
- Go to Manage Returns.
- Click Pending Requests, or enter the RMA or order number in the search box.
- Click on the RMA you want to approve.
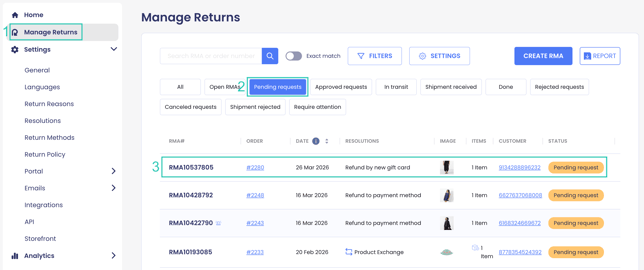
- Click APPROVE in the bottom button bar.

- Select whether to send an email notification and add notes or attachments. (Optional)
- Use the Return Method drop-down to change the return method if needed. (Optional)
Note: When changing the return method during approval, if a fee is defined and a manual invoice is required, a pop-up will appear indicating the cause of the error. You can then choose to either remove or add the fee as needed.

7. Click APPROVE RETURN to confirm.

Track Shipments
After approval, you can track whether the returned items have reached your warehouse.
When tracking shipments:
- Automatic: If you have a shipping integration with live status tracking, the shipment status updates automatically, and the RMA status changes to Shipment Received once the carrier confirms delivery.
- Manually: If your setup is manual, your team can update the RMA by manually marking it as Shipment Received.
To track or update shipments:
- Go to Manage Returns.
- Open the RMA with an Approved request status.
- Open the Shipments section to see tracking details and status updates for the return shipment.
- To update manually, select the items that have been received and click SHIPMENT RECEIVED.

Note: When marking an RMA with a new status, such as Shipment Received, you can choose whether to notify the customer about the update by configuring the option on the Emails > Content page.

Validate Items
Once items are received, you need to validate them before processing refunds or exchanges.
When validating items:
- Validation results flow back into ReturnGO automatically if you use a 3PL/WMS connection.
- If you are on a plan that supports item validation, you can mark items as received and perform validation directly in ReturnGO.
There are two ways to validate items in an RMA:- Item-Level Validation: Validate each item individually to record whether it was returned and if it can be restocked.
- Validate All: Validate all items in the RMA at once. This overrides any individual item validations.
Note: Validation can be set as mandatory in Settings > General > Item Validation, requiring all items to be validated before an RMA can be marked as Done.

Issue Refunds
You can initiate refunds directly from the RMA in your ReturnGO dashboard. ReturnGO notifies your eCommerce platform of the refund amount and method, and your platform processes the payment.
Note: The REFUND button will only be clickable when there is a refund available. Otherwise, it is greyed out.
When you initiate a refund, the refund calculator displays a breakdown of components, including item cost, taxes, fees, and discounts.
To issue a refund manually:
- Click on the RMA.

- Click REFUND/CREDIT to launch the Refund Calculator.

- Check the corresponding boxes of the fees you want to add to the Suggested Refund amount.
- Click APPLY to apply the suggested refund amount.
- Select the refund method:
- Refund to Original Payment Method - Select this to refund the amount back to the original payment method used during the purchase.
- Store Credit - Select this option to refund the amount as store credit.
- New Gift Card - Select this to refund the amount as a new gift card.
6. Edit the refund amount if necessary.
7. Toggle Restock to restock the selected items at the same time as the refund.
8. Select the location to which to restock the item.
9. Toggle Send Platform Email Notifications to trigger the eCommerce platform to send an email notification to the customer about the refund as well.
10. Click REFUND.

Auto-Refund
You can configure auto-refunds on the Return Policy page. This setup automatically issues refunds when certain conditions are met, such as when an RMA is approved, a shipment is received, or items have been validated, streamlining the process by removing the need for manual refunds in eligible cases.

Restocking Settings
In the Settings page, you can configure the Restock by field to define the method for restocking items to your store’s inventory - either linked with a refund or independently:
- Refund $0 and restock: ReturnGO requests Shopify to issue a $0 refund for the item and mark it as restocked at the specified inventory location.
- +1 to inventory location only: ReturnGO requests Shopify to increase inventory for the item at the specified location without affecting its status in the order.

Note: If you have a 3PL/WMS integration, restocking can also be handled through your connected 3PL/WMS.
Process Exchanges
Exchanges allow you to replace returned items with new ones.
- For exchanges with a price difference, any additional charges or refunds are calculated and applied automatically.
- For even exchanges, a new order is created in your eCommerce platform and sent for fulfillment without price adjustments.
- Once released, the exchange order follows your normal fulfillment flow.
To process an exchange:
- Click on the RMA.
- Click RELEASE EXCHANGE.

Complete the RMA
After validating items or processing all actions, the RMA can be closed by marking it as Done. The Done status completes the request.
- RMAs can be marked as done automatically once all actions are processed, or manually on RMAs with Shipment Received status or Approved status (when no shipment is required).
To complete an RMA:
- Open the processed RMA.
- Click MARK AS DONE.

Note: RMAs with Done status cannot be reopened. However, you can still issue a refund to the customer as a gift card or store credit even after marking an RMA as Done.
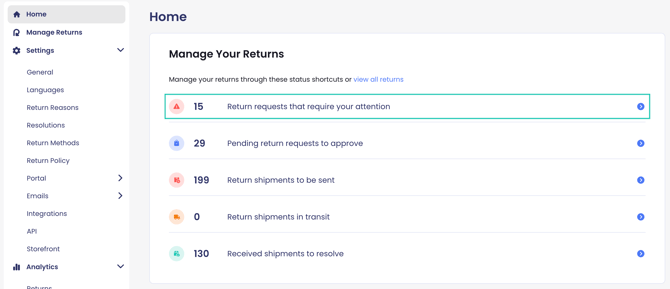
Resolve RMAs Requiring Attention
Some RMAs may encounter errors that need to be fixed before completion. You can view RMAs requiring attention from your Home dashboard. These have an icon that indicates if an RMA requires attention.
Straightforward errors, such as missing phone numbers or incorrect addresses, can usually be fixed by updating customer information directly in your eCommerce platform.
To manually resolve issues:
- Click on the RMA.

- Click on the vertical ellipsis.
- Click MANUALLY RESOLVE ISSUE.

- Click APPROVE.

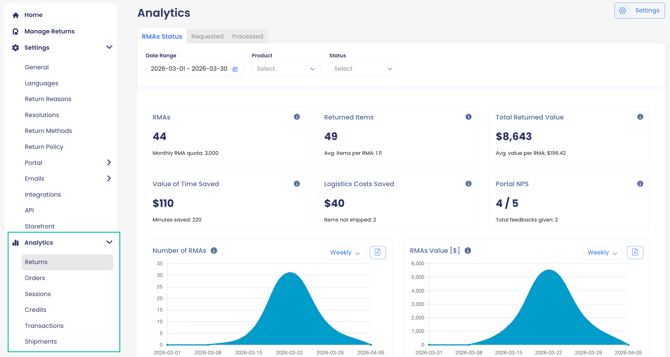
Analytics
ReturnGO provides comprehensive analytics tools to help you monitor and optimize your returns process. The Analytics page gives you insights into customer behavior, return patterns, and store performance, enabling data-driven decisions to improve efficiency, profitability, and the overall customer experience.
On these pages, you can:
- Track Return Activity: Understand trends in return requests, reasons for returns, resolutions, and outcomes.
- Analyze Orders: View how returns relate to orders placed, including return rates by product, order type, and monetary impact.
- Monitor Sessions: Review customer interactions in the portal to identify abandoned flows or bottlenecks.
- Review Transactions: See all financial movements related to returns, including refunds, store credits, and gift cards.
- Download Reports: Export RMAs, credits, transactions, return shipments, billing, and tracking data for deeper analysis, reporting, or accounting purposes.