ReturnGO seamlessly integrates with Salesforce Commerce Cloud (SFCC) to provide a comprehensive return management solution.
Requirements
- Enterprise plan
To implement ReturnGO for Salesforce Commerce Cloud, please contact your sales representative.
Features
ReturnGO provides an integrated, customizable return management solution for SFCC. Below are the key features available:
- Return Portal – Natively supported
- Customer Account Page – Natively supported
- Variant Exchanges – Natively supported
- Product Exchanges – Natively supported
- Portal Checkout – Requires payment gateway integration
- Shop Now – Natively supported
- Gift Cards – Natively supported
- Refunds – Requires OMS/payment gateway integration
- Fees – Natively supported
- Order Tracking – Natively supported
- Built-in Integrations – Natively supported
- Custom Integrations – Requires API setup
Implementation Process
To integrate ReturnGO with SFCC, you’ll need to:
- Install the ReturnGO Cartridge – Upload the cartridge and add it to your SFCC environment, according to the cartridge installation guide you will get from ReturnGO.
- Update SCAPI Scopes – Ensure SCAPI permissions are updated, including support for custom ReturnGO scopes like gift certificates that are added as part of the cartridge.
- Collect API Credentials – Gather SCAPI, SLAS, and OCAPI credentials required for authentication and send them to the ReturnGO team.
- ReturnGO Implementation – ReturnGO team will create your account and complete the integration setup.
- Integrate the Return Portal and Account Page – Configure the storefront to display the ReturnGO portal.
- Import Metadata Files – Load necessary metadata such as shipping methods and system object extensions, according to the cartridge installation guide you will get from ReturnGO.
- Configure the Portal URL – Create a user-friendly URL for your ReturnGO portal.
Credentials
The credentials you will need for integrating ReturnGO with Salesforce Commerce Cloud are:
- SCAPI Credentials:
- Realm ID
- Organization ID
- Short Code
- SCAPI Client ID
- SCAPI Client Secret
- SLAS Credentials:
- SLAS Client ID
- OCAPI Credentials:
- OCAPI Client ID
- OCAPI Client Secret
- Domain:
- Your Salesforce Commerce Cloud domain
- Site ID:
- Your Salesforce Commerce Cloud site’s Site ID
- Currency
- Physical Address (HQ)
- ReturnGO Plan ID (no action needed from you; the ReturnGO onboarding representative will include this as part of the implementation process)
To set up your ReturnGO return portal with Salesforce Commerce Cloud, you’ll need to collect the relevant credentials and send them to your ReturnGO sales representative, who will implement the integration for you.
How to Find Your Credentials
SCAPI Credentials
Realm ID
- Go to the Salesforce Commerce Cloud Control Center and click on REALMS.
- Note down the Realm ID.

![]() Organization ID and Short Code
Organization ID and Short Code
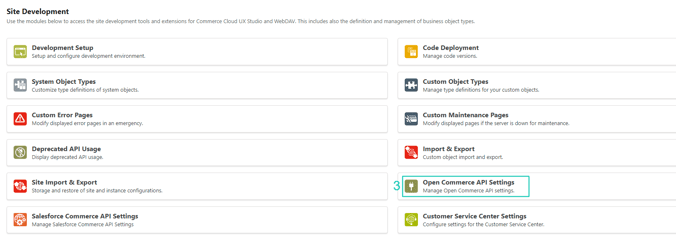
- Go to the Salesforce Commerce Cloud Business Manager and click on ADMINISTRATION.
- Click on SITE DEVELOPMENT.


5. Note down the Organization ID.

SCAPI Client ID and Secret
- Go to your Account Manager and click on API CLIENT.
- Click ADD API CLIENT.

- It’s recommended to set the Display Name as ReturnGO SCAPI.
- Note down your selected password, which is your SCAPI Client Secret.


6. Click ADD.


9. Click ADD.

10. Copy the following values into the Default Scopes field:
sfcc.shopper-baskets-orders.rw
sfcc.shopper-gift-certificates
sfcc.catalogs
sfcc.promotions.rw
sfcc.cdn-zones
sfcc.promotions
sfcc.gift-certificates.rw
sfcc.products
sfcc.gift-certificates
sfcc.pricing
sfcc.shopper-categories
sfcc.shopper-promotions
sfcc.shopper-customers.register
sfcc.shopper-products
sfcc.orders
sfcc.orders.rw
c_giftCertificates
sfcc.shopper-stores
sfcc.cdn-zones.rw
sfcc.shopper-myaccount.rw
c_giftCertificates_rw
sfcc.shopper-productlists
sfcc.shopper-product-search
sfcc.shopper-customers.login
11. Copy the following values into the Allowed Scopes field:
sfcc.shopper-baskets-orders.rw
sfcc.shopper-gift-certificates
sfcc.catalogs
sfcc.promotions.rw
sfcc.cdn-zones
sfcc.promotions
sfcc.gift-certificates.rw
sfcc.products
sfcc.gift-certificates
sfcc.pricing
sfcc.shopper-categories
sfcc.shopper-promotions
sfcc.shopper-customers.register
sfcc.shopper-products
sfcc.orders
sfcc.orders.rw
c_giftCertificates
sfcc.shopper-stores
sfcc.cdn-zones.rw
sfcc.shopper-myaccount.rw
c_giftCertificates_rw
sfcc.shopper-productlists
sfcc.shopper-product-search
sfcc.shopper-customers.login
12. Set the Token Endpoint Auth Method to client_secret_post.
13. Click SAVE.

14. Note down the generated Client ID. 
Gift Certificate Permissions
Add the relevant gift certificate permissions (c_giftCertificates_rw and c_giftCertificates), as explained in the cartridge installation guide you will get from ReturnGO.
This allows ReturnGO to send customers their gift certificate details via email.
SLAS Credentials
SLAS Client ID
- Go to your SLAS UI Manager and click on SLAS ADMIN UI LOGIN.

- Click on CLIENTS.

- Click ADD CLIENT.

- Select the relevant tenant and site.
- Set the app to be public.
- Use the default shopper scopes.
- Click ADD.

- Note down the generated SLAS Client ID.

OCAPI Credentials
OCAPI Client ID and Secret
- Go to your Account Manager and click on API CLIENT.
- Generate another API client by clicking ADD API CLIENT.

3. Fill out your details.
- It’s recommended to set the Display Name as ReturnGO OCAPI.
- Note down your selected password, which will be your OCAPI Client Secret.

4. Next to Organizations, click ADD to add an organization. 
5. Select your organization.
6. Click ADD.
7. Copy the following values into the Default Scopes field:
roles
tenantFilter
profile
openId
sfcc.shopper-baskets-orders.rw
sfcc.shopper-categories
sfcc.shopper-customers.login
sfcc.shopper-customers.register
sfcc.shopper-gift-certificates
sfcc.shopper-myaccount.rw
sfcc.shopper-product-search
sfcc.shopper-productlists
sfcc.shopper-products
sfcc.shopper-promotions
sfcc.shopper-stores
sfcc.catalogs
sfcc.orders
sfcc.orders.rw
sfcc.products
sfcc.pricing
sfcc.gift-certificates
sfcc.gift-certificates.rw
sfcc.cdn-zones
sfcc.cdn-zones.rw
8. Set the Token Endpoint Auth Method to client_secret_post.
9. Click SAVE.

10. Note down the generated Client ID.

Add OCAPI Client Key
- Go to the Business Manager, and click on ADMINISTRATION.
- Click on SITE DEVELOPMENT.

3. Click on OPEN COMMERCE API SETTINGS.
4. Set the Type to Shop.
5. Copy the following and paste it into the field, adding your OCAPI Client ID where indicated:
{
    "_v": "23_2",
    "clients": [
        {
            "client_id": "Replace this with your OCAPI ClientID",
            "resources": [
                {
                    "resource_id": "/order_search",
                    "methods": [
                        "post"
                    ],
                    "read_attributes": "(**)",
                    "write_attributes": "(**)"
                },
                {
                    "resource_id": "/customers/*",
                    "methods": [
                        "post"
                    ],
                    "read_attributes": "(**)",
                    "write_attributes": "(**)"
                },
                {
                    "resource_id": "/baskets",
                    "methods": [
                        "post"
                    ],
                    "read_attributes": "(**)",
                    "write_attributes": "(**)"
                },
                {
                    "resource_id": "/baskets/*",
                    "methods": [
                        "delete"
                    ],
                    "read_attributes": "(**)",
                    "write_attributes": "(**)"
                },
                {
                    "resource_id": "/baskets/*/price_adjustments",
                    "methods": [
                        "post"
                    ],
                    "read_attributes": "(**)",
                    "write_attributes": "(**)"
                },
                {
                    "resource_id": "/orders/*",
                    "methods": [
                        "get",
                        "patch"
                    ],
                    "read_attributes": "(**)",
                    "write_attributes": "(**)"
                },
                {
                    "resource_id": "/orders",
                    "methods": [
                        "post"
                    ],
                    "read_attributes": "(**)",
                    "write_attributes": "(**)"
                },
                {
                    "resource_id": "/products/*",
                    "methods": [
                        "get"
                    ],
                    "read_attributes": "(**)",
                    "write_attributes": "(**)"
                },
                {
                    "resource_id": "/products/*/*",
                    "methods": [
                        "get"
                    ],
                    "read_attributes": "(**)",
                    "write_attributes": "(**)"
                },
                {
                    "resource_id": "/stores/*",
                    "methods": [
                        "get"
                    ],
                    "read_attributes": "(**)",
                    "write_attributes": "(**)"
                },
                {
                    "resource_id": "/site",
                    "methods": [
                        "get"
                    ],
                    "read_attributes": "(**)",
                    "write_attributes": "(**)"
                },
                {
                    "resource_id": "/products/*/variations",
                    "methods": [
                        "get"
                    ],
                    "cache_time": 0,
                    "config": {
                        "_comment": "Add a comma-separated list of the price book ids currently active in the organization",
                        "product.prices.price_book_ids": "*"
                    }
                }
            ]
        }
6. Click SAVE.

7. Set the Type to Data.
8. Copy the following and paste it into the field, adding your OCAPI Client ID where indicated:
{
      "_v": "23_2",
      "clients":
      [
        {
          "client_id": "Replace this with your OCAPI ClientID",
          "resources":
          [
            {
              "resource_id": "/code_versions",
              "methods": ["get"],
              "read_attributes": "(**)",
              "write_attributes": "(**)"
            },
            {
              "resource_id": "/code_versions/*",
              "methods": ["patch", "delete"],
              "read_attributes": "(**)",
              "write_attributes": "(**)"
            },
            {
              "resource_id": "/jobs/*/executions",
              "methods": ["post"],
              "read_attributes": "(**)",
              "write_attributes": "(**)"
            },
            {
              "resource_id": "/jobs/*/executions/*",
              "methods": ["get"],
              "read_attributes": "(**)",
              "write_attributes": "(**)"
            },
            {
              "resource_id": "/sites/*/cartridges",
              "methods": ["post"],
              "read_attributes": "(**)",
              "write_attributes": "(**)"
            },
            {
              "resource_id":"/role_search",
              "methods":["post"],
              "read_attributes":"(**)",
              "write_attributes":"(**)"
            },
            {
              "resource_id":"/roles/*",
              "methods":["get"],
              "read_attributes":"(**)",
              "write_attributes":"(**)"
            },
            {
              "resource_id":"/roles/*/user_search",
              "methods":["post"],
              "read_attributes":"(**)",
              "write_attributes":"(**)"
            },
            {
              "resource_id":"/roles/*/users/*",
              "methods":["put","delete"],
              "read_attributes":"(**)",
              "write_attributes":"(**)"
            },
            {
              "resource_id":"/user_search",
              "methods":["post"],
              "read_attributes":"(**)",
              "write_attributes":"(**)"
            },
            {
              "resource_id":"/users",
              "methods":["get"],
              "read_attributes":"(**)",
              "write_attributes":"(**)"
            },
            {
              "resource_id":"/users/*",
              "methods":["put","get","patch","delete"],
              "read_attributes":"(**)",
              "write_attributes":"(**)"
            },

          {
          "resource_id": "/site",
          "methods": [
            "get"
          ],
          "read_attributes": "(**)",
          "write_attributes": "(**)"
         }
          ]
        }
9. Click SAVE.

Site ID and Domain
- In your Business Manager, note down the Domain, which is the first part of your URL.
- Note down the Site ID, which you can find on the left-most section of the toolbar.
-png.png?width=680&height=268&name=SFCC_Domain%20(2)-png.png)
Once you have gathered all the required information, please send it to your ReturnGO sales representative. They will enable the integration and provide any further instructions needed.