ReturnGO enables you to restock returned items directly from your ReturnGO dashboard.
Restocking returned items can be done through ReturnGO either through the RESTOCK button or while manually issuing a refund through the refund calculator.
When you restock through ReturnGO, ReturnGO instructs your eCommerce platform to restock the items in one of the following ways, depending on your settings:
- Refund + restock - the action equivalent to restocking through Shopify’s Refund Screen (for Shopify merchants).
- Add to inventory location - the action equivalent to adjusting the item’s inventory level on Shopify’s Inventory Screen (for Shopify merchants).
This article describes the characteristics of each restocking method, their differences, and how you can set your store's restocking method.
Requirements & Limitations
For stores hosted on Shopify, ReturnGO restocking occurs through Shopify, and therefore Shopify's limitations also apply to restocking performed via ReturnGO.
While this ensures consistency across platforms in the restocking process, it’s important to be aware of these limitations when using the restocking feature, in order to effectively manage your inventory.
The limitations of restocking include:
- Once an item has been restocked, the action cannot be reversed.
- Restocking is done at the item level, and the item status is applied per line item.
- Since Shopify doesn’t support restocking items that have already been refunded to the original payment method, ReturnGO cannot perform this action either.
Setting Up Your Restock Method
Select the method for restocking items to your store’s inventory - either linked with a refund or independently.
To choose a restock method:
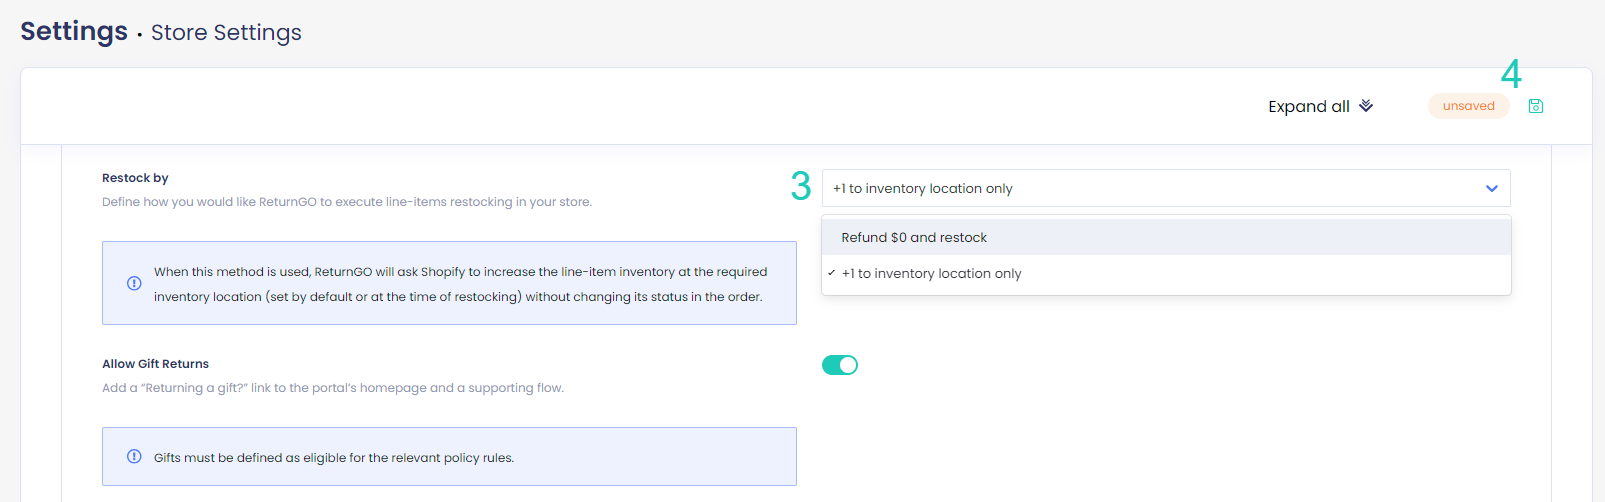
- Go to Settings > General.
- Open up the General Returns section.

- Under Restock by, select your preferred restocking method from the drop-down.
- Click the save icon to save your settings.
How Restocking Works
ReturnGO supports two methods for restocking inventory. Regardless of the method you select, the result will be the same - if you click the RESTOCK button the item will get restocked, and if you restock via the refund pop-up, the refund will be issued and the item will be restocked.
The difference between the methods is technical and is based on the action that happens in Shopify.
Note: The differences in how the refund is issued and documented can impact Shopify reports. Therefore, it is recommended to consult with your accounting department on which method is best for them.
Let’s break down the methods and how they work:
1. Refund and Restock
This method uses the Shopify refund function which includes restocking the returned item.
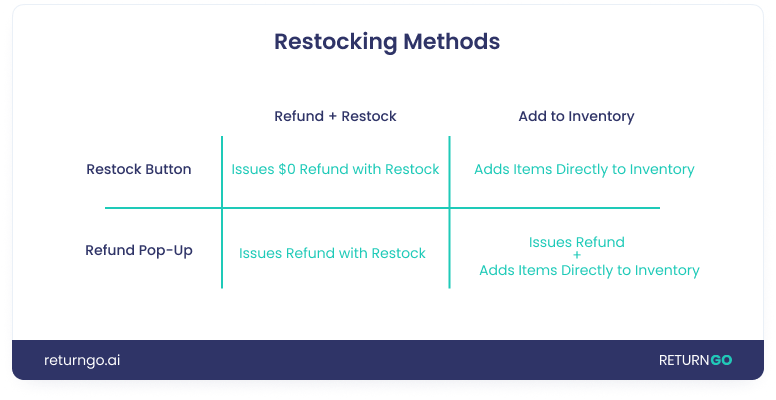
Using this method, when restocking through the RESTOCK button on the RMA page, ReturnGO will instruct Shopify to restock the item with a $0 refund amount.
When restocking through the refund calculator, ReturnGO will instruct Shopify to restock the item with a refund amount that you define.
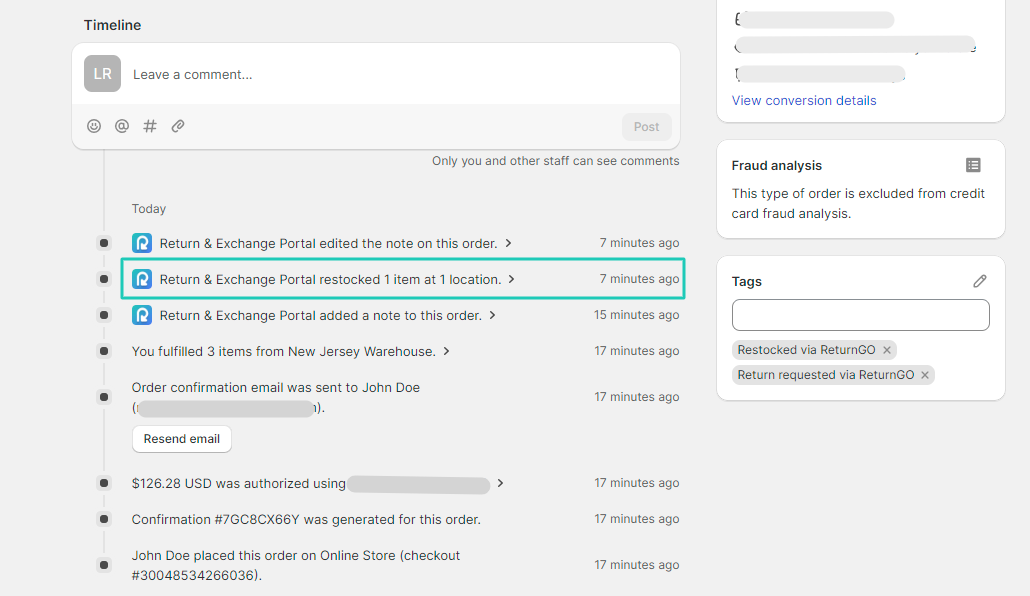
The restock will be documented on the Shopify order’s timeline in addition to the order and RMA notes.
This method associates the restocking action with the original order in Shopify’s inventory adjustment history.
Limitations of this Restock Method
The limitations of this restock method are:
- If you only restock, without issuing a refund - you'll only be able to issue order-level refunds later, and not item-level refunds.
- If you only refund, without restocking - you won’t be able to restock through ReturnGO later, and will have to go into your store inventory on Shopify and manually adjust the inventory.
Note: You will still have the option to restock the item if the refund is issued as store credit or a gift card.
2. Add to Inventory
When using this restocking method, ReturnGO instructs Shopify to add the returned item directly back into your Shopify inventory without issuing a refund, increasing the inventory count for that item just like if you manually adjusted the quantity in your Shopify store settings.
Using this method, there's no dependency between the actions of refunding and restocking.
Click the RESTOCK button on the RMA page to return the items to inventory, and then later on, when your accounting department issues the refund, they will need to issue a refund without selecting any items.
Note: When using the Add to Inventory method, Shopify does not display the related order in the inventory adjustment history. This means the restocking action won't be tied to the original order, but rather a standalone action.
Limitations of this Restock Method
The limitations of this restock method are:
- The restock won’t appear in the order timeline, only in the order and RMA notes.
How to Restock
Regardless of the restocking method you defined in your settings, the actions you take to restock returned items is the same.
There are two ways to restock items from the ReturnGO dashboard.
1. Restock Button
On the RMA page, there’s a restock button that you can click to restock the selected items from the RMA once the return shipment has been received.
To restock an item through the restock button:
-
Go to Manage Returns.
-
Search for a return request using the RMA number or Shopify order ID. You can also use the Shipment Received filter to shorten the list.
-
Click on the relevant RMA to open the RMA page.

-
In the RMA page, make sure that the relevant items are checked.
-
Click on the RESTOCK button.

-
In the Restock pop-up, choose the inventory location where the item should be restocked.
-
Click RESTOCK.

When using the refund + restock method, Shopify will issue a $0 refund together with restocking the items.

When using the add to inventory method, Shopify will simply add the returned items back to inventory, without issuing any refund.

2. Refund Calculator
When issuing a refund through the refund calculator, you have the option to restock returned items at the same time.
To restock an item from the refund calculator:
- Go to Manage Returns.
- Search for a return request using the RMA number or Shopify order ID. You can also use the Shipment Received filter to shorten the list.
- Click on the relevant RMA to open the RMA page.
- In the RMA page, make sure that the relevant items are checked.
- Click REFUND/CREDIT to launch the Refund Calculator.

- Check the corresponding boxes of the fees you want to add to the Suggested Refund amount.
- Click APPLY to apply the suggested refund amount.
- Select the refund method:
- Refund to Original Payment Method - Select this to refund the amount back to the original payment method used during the purchase.
- Store Credit - Select this option to refund the amount as store credit.
- New Gift Card - Select this to refund the amount as a new gift card.
- Refund to Original Payment Method - Select this to refund the amount back to the original payment method used during the purchase.
- Edit the refund amount if necessary.
- Toggle Restock to restock the selected items at the same time as the refund.
- Select the location to which to restock the item.
- Toggle Send Platform Email Notifications to trigger the eCommerce platform to send an email notification to the customer about the refund as well.
- Click REFUND.

When using the refund + restock method, Shopify will issue the refund together with restocking the item.
When using the add to inventory method, Shopify will perform two separate actions:
- Issue the refund
- Add the items directly to the inventory
Restocking FAQs
What Happens When I Restock an Item?
The results will be the same when you restock an item using either method:
- The returned item will be added back into your Shopify store’s inventory.
- On the RMA page in ReturnGO, you’ll see a restocked icon on the line item as well as a note in the internal notes section.


- You’ll see the RMA updates in Shopify under the order's notes.

What’s the Difference Between the Methods?
The two restocking methods are different in terms of the actions Shopify takes when triggered by ReturnGO.
Each method affects reporting differently, so be sure to check with your accounting department which method is best for them reporting-wise.
The main differences for you to take into account are:
- The refund + restock method prompts you to process both the refund and restock at the same time. This ensures that you execute the intended actions accurately.
- However, you’ll need to take care to avoid exclusively restocking or refunding, as this would restrict the possibility of performing the other action later.
- The add to inventory method gives you more flexibility to restock and refund separately, with no dependency between the refund and the restock.
- However, Shopify's inventory adjustment history won’t show which order the restock is associated with.
With both methods, you can restock only once per item.
If I have an automated RMA process, how can I prevent automatic restocking?
To prevent ReturnGO from automatically restocking items still using automated return validation and refund processing, ensure your Restock by setting is set to Add to Inventory (+1 to inventory location only). For additional control, you can use Shopify Returns to manage restocking directly within Shopify.