Add-ons are features that you can purchase individually to extend the capabilities included in your subscription plan.
Requirements
- Admin or owner user role permissions on ReturnGO.
- The ReturnGO free trial has ended.
- For Shopify merchants: Store owners and staff with View Billing and Receive Billing Emails permissions on Shopify.
Types of Add-Ons
ReturnGO offers two main types of add-ons:
1. On/Off Add-Ons:
These are add-on features that can be enabled or disabled. While you usually will still need to set up the feature before you can use it, purchasing the add-on will enable the relevant settings.
2. Quota-Based Add-Ons:
These are features that come with a limit or quota. Purchasing a quota-based add-on will either increase your existing quota, such as the number of users, available storage, or other limits, or it may enable a new feature along with its own predefined quota.
How to Add/Remove Add-Ons
To enable an add-on:
-
Click the account icon in the top-right corner of your ReturnGO dashboard.
- Click on STORE ACCOUNT.

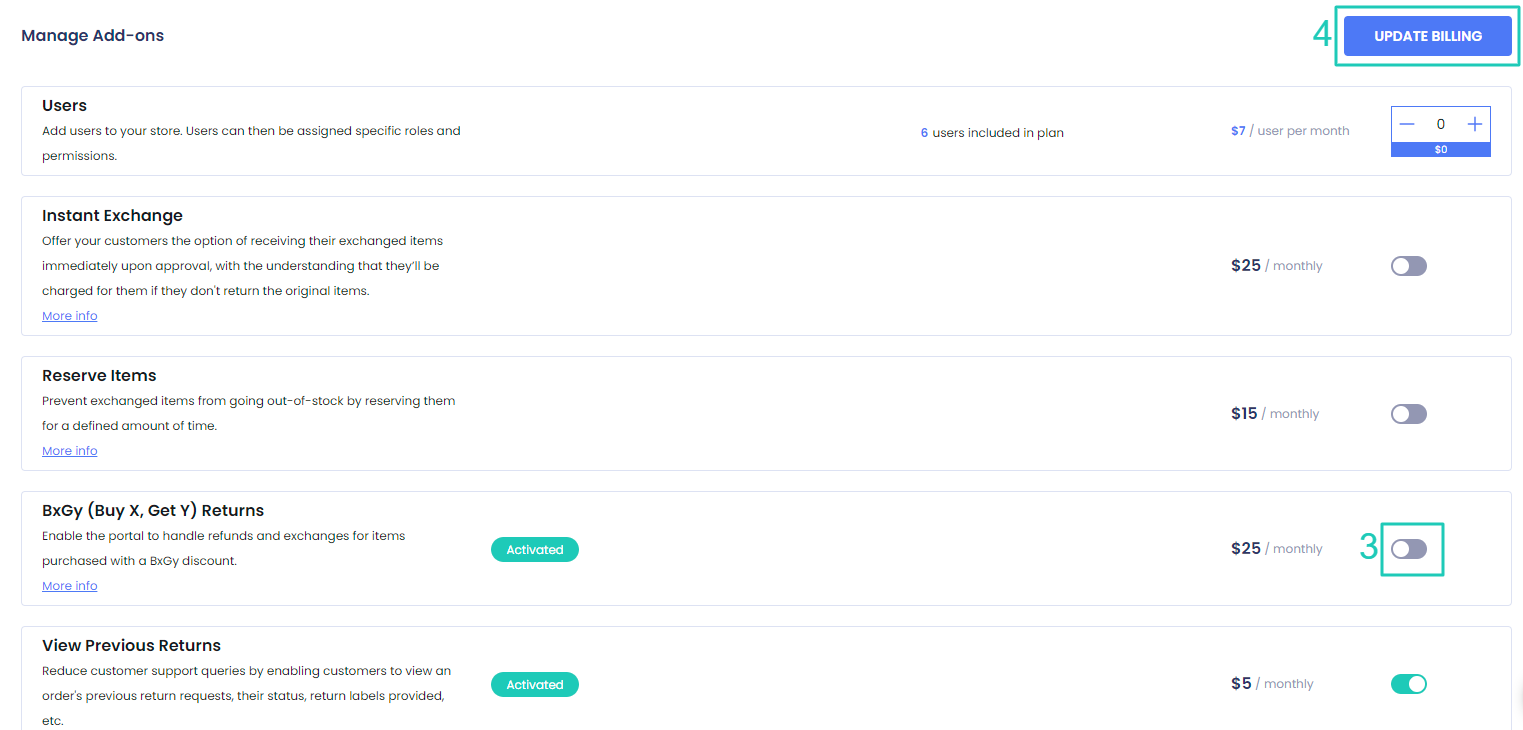
- In the Manage Add-Ons section, enable the toggle or click the plus sign next to the relevant add-on.
- Click UPDATE BILLING.

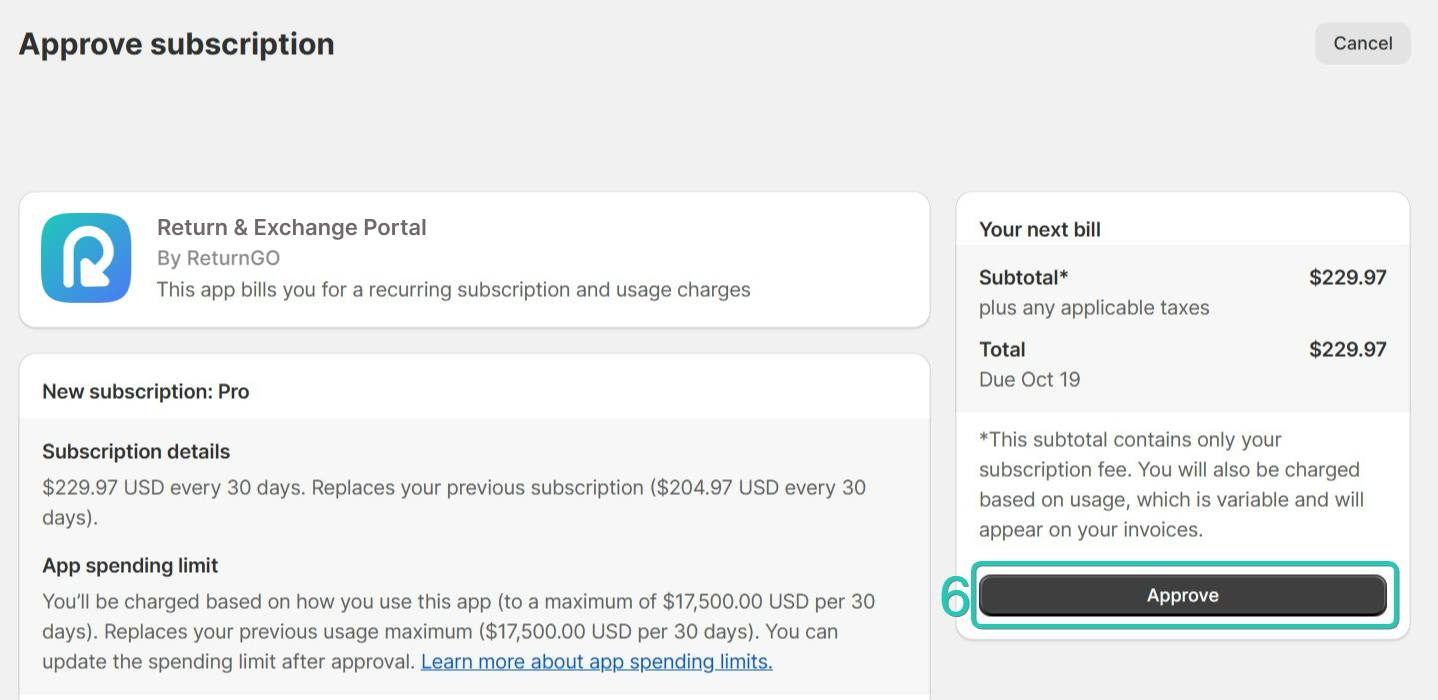
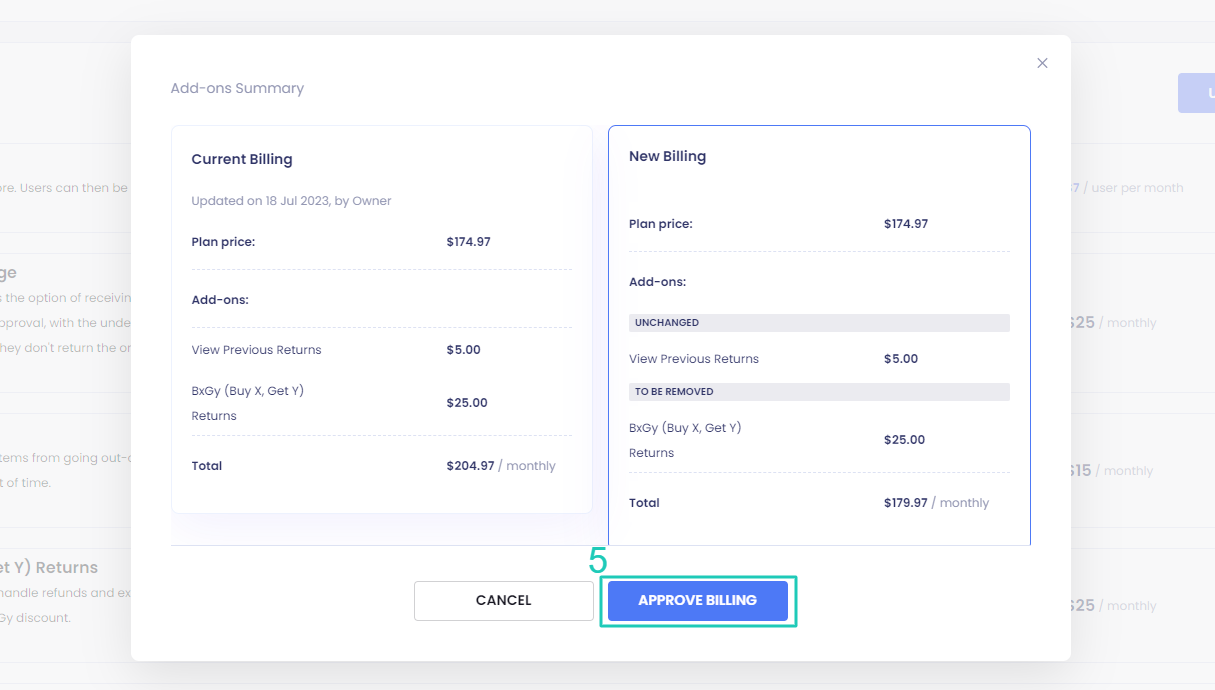
- In the Add-Ons Summary dialog box, review the new monthly billing, then click APPROVE BILLING. You will be redirected to your eCommerce store (i.e Shopify) to accept the new billing details.

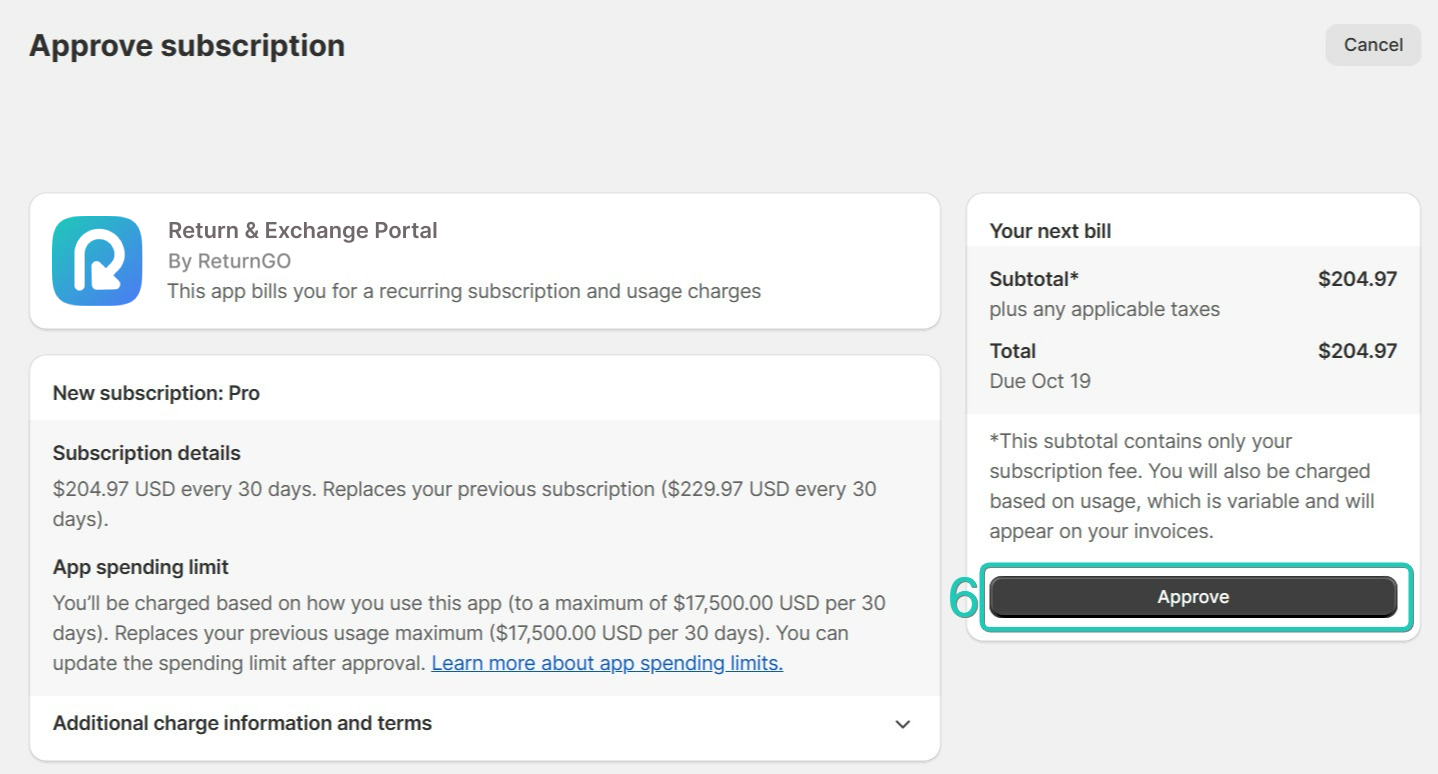
- For Shopify merchants - You’ll be taken to the Shopify Approve Subscription page, where you need to click APPROVE.
To remove an add-on:
- Click the account icon in the top-right corner of your ReturnGO dashboard.
- Click on STORE ACCOUNT.
- In the Manage Add-Ons section, disable the toggle or click the minus sign next to the relevant add-on.
Note: If an add-on is greyed out, it could be because your account is still on a trial period.
4. Click UPDATE BILLING.
5. In the Add-Ons Summary dialog box, review the new monthly billing, then click APPROVE BILLING. You will be redirected to your eCommerce store (i.e Shopify) to accept the new billing details.
6. For Shopify merchants - You’ll be taken to the Shopify Approve Subscription page, where you need to click APPROVE.
Note: If you don’t approve the billing immediately, you will see an ACCEPT NEW PLAN button the next time you visit your ReturnGO dashboard, which will redirect you to your eCommerce platform to complete the approval. The add-on features will not be available until you approve the billing.

Add-On Charges in Billing History
You can easily keep track of the charges associated with your add-ons in your billing history.
To see what you paid for add-ons in your billing history:
-
Click the account icon in the top-right corner of your ReturnGO dashboard.
-
Click on BILLING HISTORY.

-
Under the Add-ons column, you can see how much you paid for add-ons for each billing cycle.

-
To see a full breakdown of the billing details, click on the icon under the Details column.
-
In the Billing Details popup, you can see an overview of the selected charge, including any add-ons.
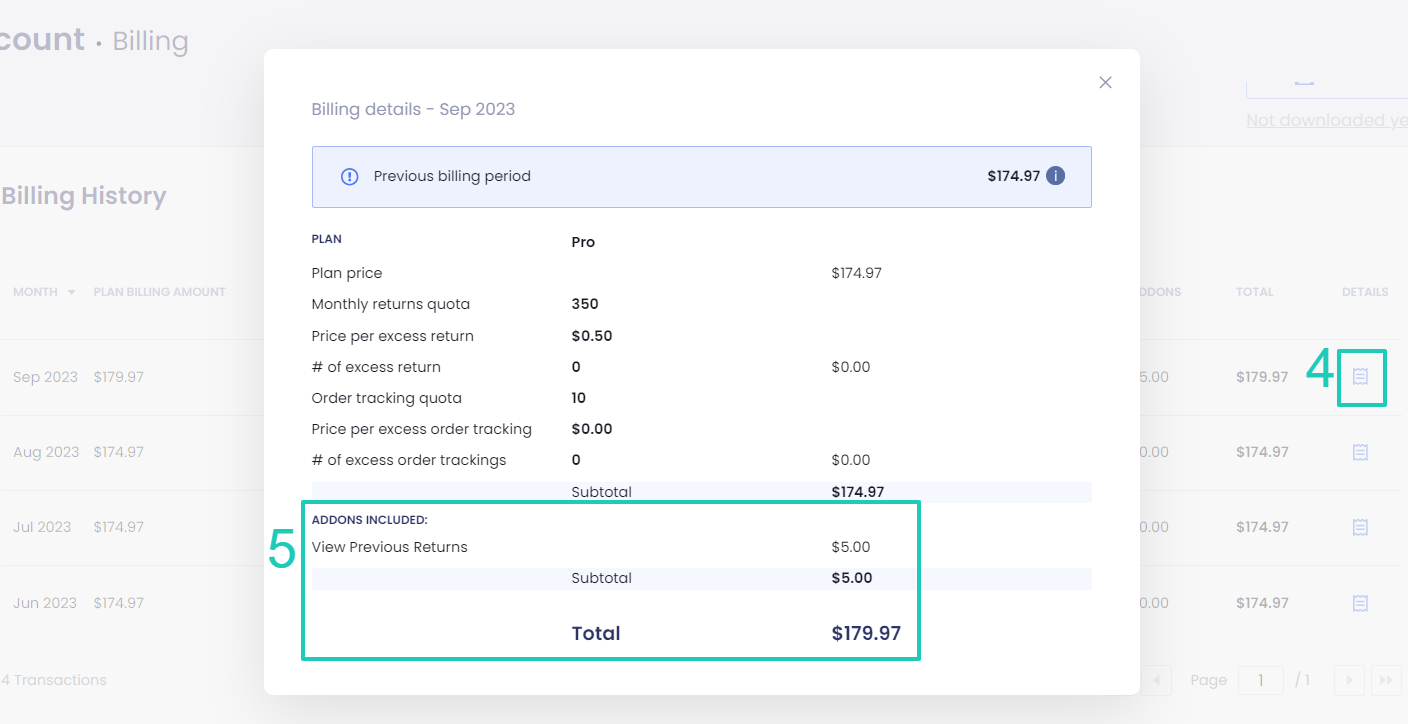
Note: Add-ons are charged on a monthly basis, regardless of your subscription plan cycle.
Upgrading and Downgrading Plans with Add-Ons
Here's what happens when you upgrade or downgrade your ReturnGO subscription plan while you have active add-ons:
Self-Service Plans
Upgrading Plans
When upgrading your subscription plan:
- The Subscription Plan page will change to reflect your existing add-ons.
- The system will check whether the add-on is included in the plan you are upgrading to or downgrading from.
- If the add-on is not included in the plan you are upgrading to, it will appear in the add-ons section and its price will be added to the overall monthly price.
- If the add-on is included in the plan you are upgrading to, its price will be removed from your bill.
- On/off add-ons will be automatically disabled if they are included in your plan. For quota-based features, such as additional users, the purchased quota is kept as an add-on.

Note: If an add-on is already part of your plan, you can't add it as a separate item. For example, since every plan already includes at least one user, you can add additional users on top of the plan's allotted quota and remove only those you've manually added.
Downgrading Plans
When downgrading your plan:
- All add-ons you enabled on your previous plan will remain active.
- Any features that were previously included in your plan and aren’t included in the new plan won't automatically become add-ons - if you want to keep these features, add them manually to your new plan as add-ons.
Custom Plans
- If you have a custom plan, the person creating/assigning the plan will take into account add-ons when assigning the new plan.