Refund to Store Credit
Last Updated: February 4, 2026
Refund to Store Credit is a return resolution that enables stores to refund customers with store credit. Learn more about ReturnGO’s store credit system here.
Capabilities
The Refund to Store Credit return resolution enables you to:
- Give your customers their refund as store credit that they can use for future purchases.
- Refund your customers while keeping the revenue in your store.
- Incentivize customers beyond the original payment amount for choosing this resolution.
Issuing Store Credit
When you issue store credit to your customers:
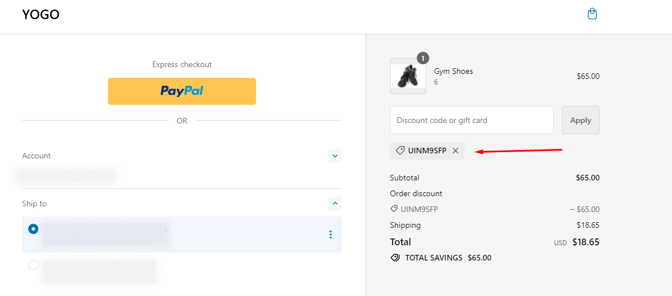
- ReturnGO generates a discount code.
- An email with the discount code is sent to the customer.
- The refunded amount will be documented on the RMA page and in the Shopify order notes and timeline.
ReturnGO-issued store credit is reusable. If store credit is issued multiple times to a customer, their store credit balance will increase with each new credit.

- The widget scripts exist on the relevant pages.
- The customer is logged in to their account on your site.
- The customer has received store credit or gift cards through ReturnGO.

Requirements and Limitations
The refund to store credit feature has requirements and limitations:
- Each customer gets a discount code for the store credit and can use it at checkout.
- Shopify limitations:
- ReturnGO's store credit is built on Shopify’s fixed-value discount solution.
-
- Shopify allows only one discount code per purchase, regardless of its discount type.
Configuring Refund to Store Credit
There are many settings you can configure to manage how the store credit resolution will behave in your returns flow.
To configure refunds to store credit:
1. Go to Settings > Resolutions.
2. Open the Return Resolutions section.
3. Click REFUND TO STORE CREDIT or create a new resolution.

3. Set the internal name for the resolution, so you'll be able to identify it.
4. Set the display name for the resolution, which is how customers will see it in your portal.
5. Edit the description, which customers will see in your portal.

6. Set the refund type to Credits.
7. Define the amount you want to offer the customer. You can use this to incentivize customers to choose this refund type.
8. Click on the save icon to save your changes.

You can use the store credit resolution you created to build your Return Policy where you can configure additional settings such as eligibility rules, fees, and more.
Setting the Validity Period of the Store Credit
You can set the validity period of store credit through your Store Settings page. To set the validity period of store credit:
1. Go to Settings > Store Settings.
2. Open the Refund Alternatives section.
3. In the return credits expiration section, edit how long customers have to use the credits you issued to them (e.g. 6 months).
4. Click on the save icon to save your changes.

Setting the Refund Limit for Store Credit
This feature is currently in beta and not yet available to all merchants. Apply to join the beta.
You can configure the limit for manual store credit refunds. This affects the Available Amount in the refund calculator, enabling you to manually issue a refund that is higher than the paid amount, but with a certain limit to prevent accidentally issuing excessive refunds.
To configure the refund limit:
1. Go to Settings > Store Settings.
2. Open the Refund Alternatives section.
3. Under Store Credit, set the Limit Manual Refunds by percentage.
4. Click on the save icon to save your changes.

Adding Store Credit
You can add to your customers’ store credit from your ReturnGO dashboard. To add store credit:
1. Go to Analytics > Credits.
2. Search for the customer ID.
3. Click on the +/- BUTTON in the Actions column.

a. Choose Issue Credits from the drop-down list.
b. Type the amount you want to add.
c. Write a comment to explain why you adjusted the customer’s store credit balance. Customers will be able to see this note on their transactions page.
4. Click on ADJUST BALANCE.

Deleting or Withdrawing Store Credit
You can delete or withdraw a customer’s store credit:
1. Go to Analytics > Credits.
2. Search for the customer ID.
3. Click on the +/- BUTTON in the Actions column.

a. Choose Withdraw Credits from the drop-down list.
b. Type the amount to be removed.
c. Write a comment to explain why you adjusted the customer’s store credit balance. Customers will be able to see this note on their transactions page.
4. Click on ADJUST BALANCE.

Viewing Store Credit
There are two ways to view your customers' store credit:
1. You can search for the customer ID in Analytics > Credits. This page will show you all the discount codes, credit balance, and gift cards.
2. You can search for the discount code in Shopify Admin > Discounts.
