Integration With Klaviyo
Last Updated: February 4, 2026
ReturnGO integrates with Klaviyo to enable you to easily customize and automate notifications. By integrating the two platforms, you can update customers' Klaviyo profiles with return events as metrics, and create Klaviyo flows to send RMA-related emails and/or SMS notifications instead of sending them through ReturnGO.
Capabilities
The Klaviyo integration supports:
- Automated event triggers.
- Sending emails and SMSs using RMA information and events.
- Viewing return event metrics in Klaviyo.
You can read more about Klaviyo here.
Limitations
-
Adding attached files and additional details to RMA status update emails is not currently supported by the Klaviyo integration.
-
Klaviyo supports only plain text, not rich text.
Requirements
To link Klaviyo to your ReturnGO account, you will need:
- ReturnGO Enterprise plan
- Klaviyo account
- Klaviyo API key
To get your Klaviyo API key:
- Log in to your Klaviyo account.
- Go to Account & Billing > Settings.
- Click on API KEYS.
- Create a full-access Private API Key.
Linking Your Klaviyo Account to ReturnGO
To link your Klaviyo account to ReturnGO:
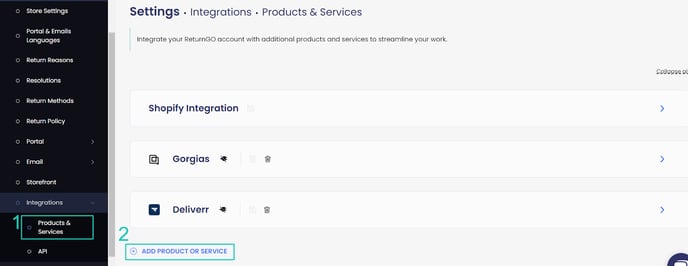
1. Go to Integration > Products & Services.
2. Click on +ADD PRODUCT OR SERVICE.

3. Choose Klaviyo from the drop-down list.
4. Click the green check mark.

5. Enter your credentials.
6. Click CONNECT.

Testing Events
Before starting to use the integration, it’s a good idea to test the events to see how they affect Klaviyo flows and filters and to show ReturnGO events as metrics in Klaviyo.
To manually test specific event triggers and see the effects in Klaviyo:
- Go to Settings > Email > Content.
- Open the section of the notification type you want to configure, Return Emails or Order Tracking Emails.

- Click on the test tube icon next to the relevant event.

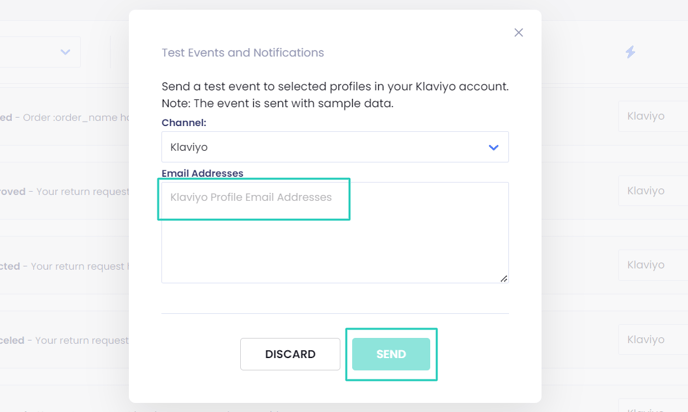
- In the test email pop-up:
- Type the email address/es to which the test email should be sent.
- Click SEND.

This sends the relevant event to Klaviyo. The event includes sample data in order to give you an idea of what it will look like.
Once the test is sent, the following will happen:
- The event will be displayed in the timeline of the customer profile (based on the email address used in the test), including the event data.
- You can include the event in the metrics of the customer profile.
-
- To add an event as a metric in Klaviyo:
-
-
-
-
- Click the EDIT button next to the Metrics header.
- Select a ReturnGO event from the drop-down menu.
- Click the ADD METRIC button.
- Click the UPDATE button.
-
-
- The event can be set as a metric trigger in Klaviyo flows.
- You can use the event as a filter in Klaviyo flows, segmentations, and other functions. The event's data variables can be used in a similar manner.
Sending Notifications from Klaviyo
Choose which notifications to send via Klaviyo, ReturnGO, or not send at all.
The system will update your Klaviyo account only for events that you select on the Settings > Email > Content page.
To define the channel through which each notification will be sent:
- Go to Settings > Email > Content.
- Open the section of the notification type you want to configure, Return Emails or Order Tracking Emails.

- Click on the dropdown next to the notification you want to change.
- Select whether you want to send it via Klaviyo, ReturnGO, or not at all.
Note: When you issue a refund to a gift card, the gift card code email is sent directly by your eCommerce platform (e.g., Shopify). Emails sent through Klaviyo or ReturnGO will not include the gift card code, as this notification is handled by your eCommerce platform.

For notifications you mark as “Sent by Klaviyo”, create Klaviyo flows to send them and trigger these flows based on the relevant events.
Note: It's recommended to set up your flows in Klaviyo before changing your ReturnGO settings to send notifications via Klaviyo.
How To Create A New Flow Based On Existing ReturnGO Triggers
For notifications you want to send through Klaviyo, create Klaviyo flows to send them, based on ReturnGO events and variables.
To create a new flow based on an existing ReturnGO trigger event:
1. Log in to your Klaviyo account and go to the flows settings.
2. Click on CREATE FLOW to build a new flow.

3. Name the flow something clear and unique to make it easy to identify in the future.
4. Click on CREATE FLOW.

5. Select a Trigger.
Note: These triggers are predefined and will be available in Klaviyo once you’ve connected Klaviyo to ReturnGO.

6. Choose the desired trigger event from the list of predefined metrics from ReturnGO.

7. Click CONFIRM & SAVE.

8. Configure the Action:
- Decide on the action that will follow the trigger, such as sending an email or SMS to the customer.

9. Edit the email details, content, and settings.
To add ReturnGO variables to your message content, use the following format: {{ event.variable }}. For example: {{ event.order_name }}.
Learn more about using variables in Klaviyo.

10. Click DONE in the top right corner.

11. Click on REVIEW AND TURN ON to check your flow settings.

12. Select the action
13. Click TURN ON.

14. Click UPDATE STATUSES.

Note: After activation, ensure that the new flow has been added to the flows list and is properly set up.

15. Go to Settings > Emails > Content.
16. Choose Klaviyo as the email provider.
17. Click on the save icon to save your changes.

Reproduce the necessary steps to trigger the flow you created. Once triggered, Klaviyo will automatically execute the specified action, such as sending an email or SMS.
Portal-Based Segmentation
If you are using multiple ReturnGO portals, you can segment Klaviyo flows based on the portal that triggered the event. This enables you to send different messages depending on which portal the return was submitted through.
Use the portal_name variable as a condition in your Klaviyo flow to apply this segmentation.
To set up portal-based segmentation in Klaviyo:
- Open the flow you want to apply portal-based segmentation to, or create a new one.
- Add a trigger filter.
- Use the portal_name variable as the filter condition.
- Set the value to the name of the portal you want to target.
Example condition:
portal_name equals Return Portal
This enables you to create separate flows for different ReturnGO portals.

Events & Variables
ReturnGO events act as triggers for Klaviyo flows, and ReturnGO can be added to notifications to personalize the information provided.
Clicking on the lightning bolt icon at the top of the email content page will take you to the Variables & Events page, where you can view all RMA events and variables that can be used in Klaviyo flows.

Events
ReturnGO events can be used as triggers in Klaviyo flows, to automatically send certain notifications when a certain event happens, such as when the request is approved or the shipment is received.
When your Klaviyo and ReturnGO accounts are integrated, ReturnGO events can be selected directly within Klaviyo.
Returns Events

Tracking Events
![]()
Variables
Adding variables to your notifications can personalize the information provided, such as adding the RMA ID or reject reason directly into the message.
To add ReturnGO variables to your message content, use the following format: {{ event.variable }}. For example: {{ event.order_name }}.
Learn more about using variables in Klaviyo.
Returns Variables

Tracking Variables
![]()
Troubleshooting the Integration
Many of the issues encountered related to integration can be identified during setup.
Here are some common issues and how you can address them.
Setup Issues
Make sure your API credentials are accurate.
- There should be no extra spaces before or after each API entry.
- Make sure you are using live or production API credentials, and not dev or test APIs.
- Try to re-generate a new API key and reconnect.
Other Issues
Order Not Receiving Updates
Automatic order tracking in ReturnGO is triggered by order fulfillment. When an order is fulfilled and the automatic tracking setting is activated, ReturnGO receives updates from your eCommerce platform. As the shipment progresses through its life cycle, ReturnGO will be updated and trigger any related notifications.
However, if automatic tracking was not enabled at the time the order was fulfilled, ReturnGO will not receive further updates for that shipment. To backfill tracking information, manually enter the order's details into the tracking portal, and future updates will be registered in ReturnGO.
Tip: It's recommended to always enable automatic order tracking to avoid missing updates.
Commonly Conflated Order Tracking Statuses
- Ready for Pickup: Refers to when the carrier collects the package from the warehouse.
- Ready for Collection: Refers to when the customer can pick up the package from the delivery center.
Klaviyo-Related Issues
For Klaviyo-related issues, please contact Klaviyo support.
For any other issues, feel free to contact ReturnGO support through chat or email.