Integration With Stripe
Last Updated: February 10, 2026
ReturnGO integrates with Stripe to enable you to use the Stripe checkout system as part of your portal flow for easy in-portal checkout and instant exchanges at no risk to your store.
Limitations
- Using the Stripe integration, the portal can only accept payment methods that support payment authorizations.
- The Stripe integration does not support issuing general refunds. Only upsell refunds are supported directly within ReturnGO.
Note: If a customer returns an exchanged item that was paid for through Stripe, you’ll need to issue a refund manually through Stripe to process a refund to the original payment method. However, for store credit or alternative refund methods, the refund can be processed directly within ReturnGO as usual.
Linking Your Stripe Account to ReturnGO
To link your Stripe account to ReturnGO:
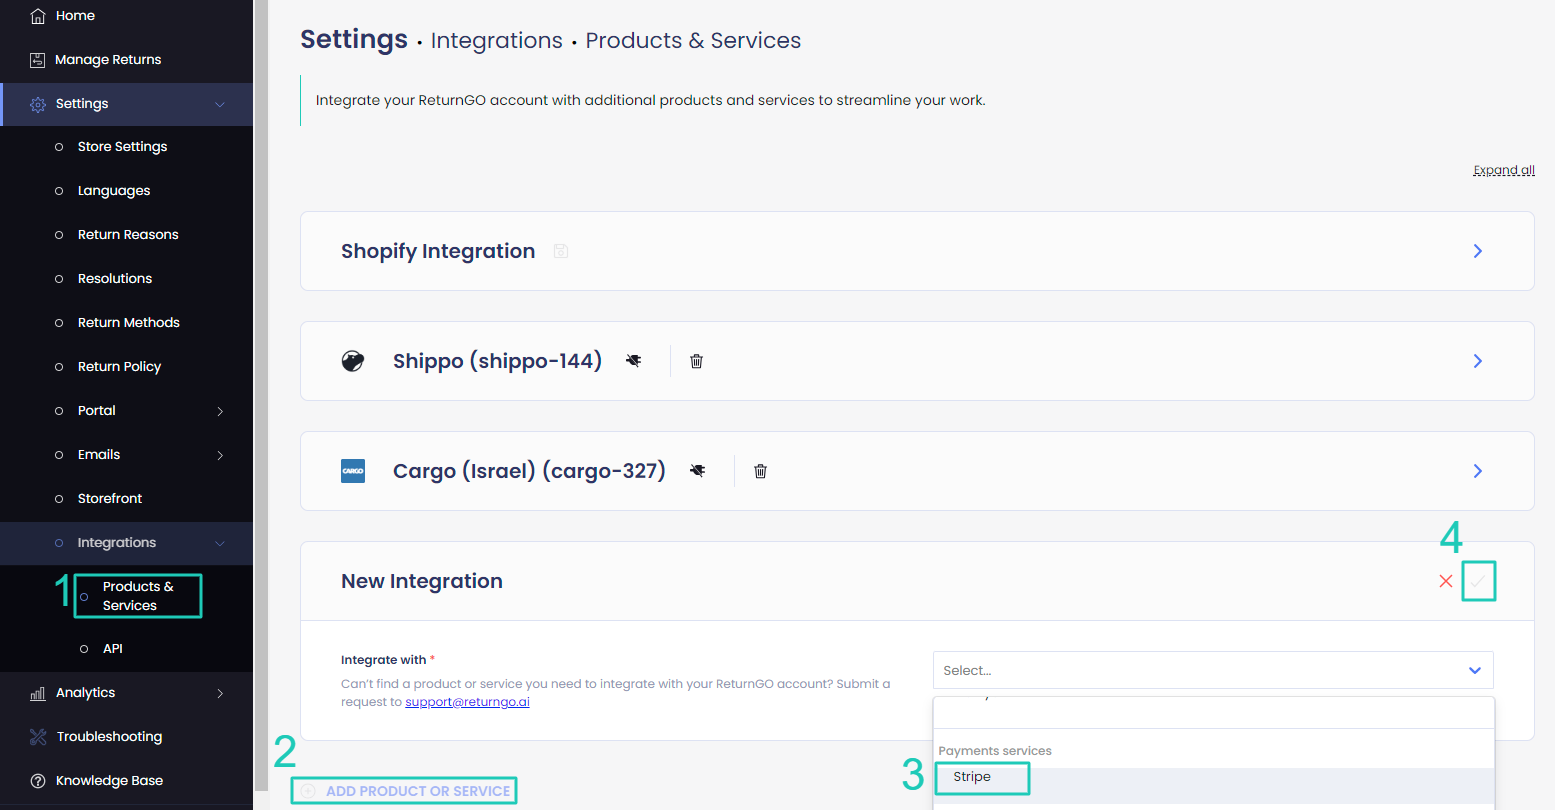
- Go to Settings > Integrations > Products & Services.
- Click on +ADD PRODUCT OR SERVICE.
- Choose Stripe from the drop-down list.
- Click on the check mark.

5. Click CONNECT.

6. Log in to your Stripe account or create a new one.
- If you choose an existing business, you can easily log in using your Stripe credentials through the popup.
- If you don't have an account, you can create one through the popup, and the account will be created. Then you will need to log in to your account on Stripe and complete the onboarding before connecting the integration.
Stripe Test Mode
You can enable test mode to test your Stripe integration before processing real transactions.
To activate test mode:
- Go to Settings > Integrations > Products & Services.
- Open the Stripe integration card.
- Check the Sandbox mode checkbox.

4. Set up your Stripe integration in test mode using test credentials.

Portal Checkout
Portal checkout simplifies the return and exchange process by seamlessly integrating a checkout screen into the portal flow. By adding a checkout step to the end of your portal flow, you can simplify the customer experience and let customers pay their RMA balance directly in-portal.
To enable portal checkout with Stripe:
- Go to Settings > Integrations > Products & Services.
- Open the Stripe Integration section.
- Enable the Portal Checkout toggle.
- Add a Gateway Name.
- Click on the save icon to save your changes.

Refunds for Upsell Exchanges
You can initiate and process refunds for upsell amounts collected via Stripe directly within ReturnGO. Upsells and payments captured through Stripe are automatically available for refund through the RMA/refund calculator, allowing you to manage refunds as part of the standard RMA flow.
Refunds are processed automatically through Stripe, with confirmation recorded in the RMA Timeline.
To enable direct refunds for upsell exchanges:
- Go to Settings > Integrations > Products & Services.
- Open the Stripe Integration section.
- Enable the Enable Direct Refunds toggle.
- Click on the save icon to save your changes.

Supported Locations
Stripe-powered features such as portal checkout and instant exchanges are available only in countries and regions supported by Stripe. When customers initiate a return from a supported location, the portal will load the Stripe-powered checkout as part of the return flow.
If a customer accesses the return portal from a location that is not supported by Stripe, the Stripe checkout will not work.
Troubleshooting the Integration
If a popup appears on ReturnGO with a message saying "Connection failed. The Stripe account activation process is not completed. Please activate your Stripe account on Stripe.com and try again." - you will need to complete the following steps.

1. Go to the Stripe dashboard and log in to the account that was just created.

2. Go through all the onboarding steps.
-png-1.png?width=670&height=357&name=image%20(38)-png-1.png)
3. Go back to ReturnGO and connect the integration again.
Other Issues
For Stripe-related issues, please contact Stripe customer support.
For any other issues, feel free to contact ReturnGO support through chat or email.