Portal Checkout
Last Updated: December 24, 2025
Add a checkout step to the end of your portal flow to simplify the customer experience and let customers pay their RMA balance in-portal.
What is Portal Checkout?
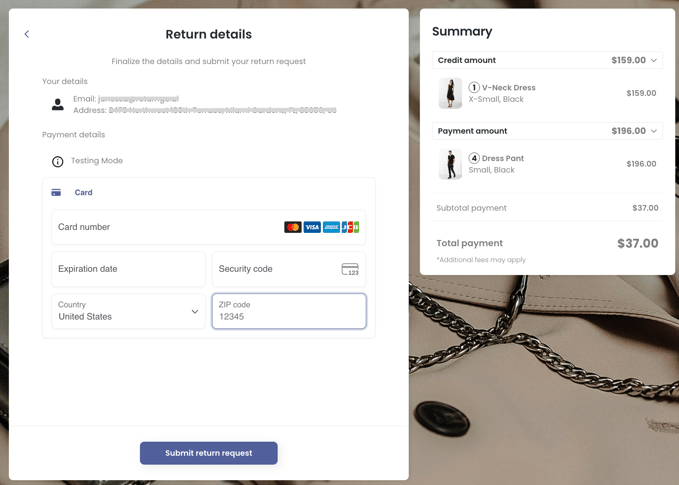
Portal checkout simplifies the return and exchange process by seamlessly integrating a checkout screen into the portal flow.
When customers initiate an RMA they need to pay for (i.e fees or exchanges), they input their payment details directly into the portal, eliminating the need for separate draft orders and ensuring a straightforward experience.
Limitations
- Works only for customers in locations supported by your connected payment gateway provider.
Requirements
This feature is available as an add-on.
To utilize portal checkout, you’ll need:
- Active Stripe integration - Set up an integration with Stripe in order to use this feature.
- Enabled portal checkout feature - Enable the portal checkout feature on your ReturnGO Store Settings page.
Benefits
The benefits of using portal checkout include:
- Eliminates draft orders - Customers experience a streamlined process as they input payment information directly within the portal flow, eliminating the need for the creation of separate draft orders and separate invoices.
- Enhances the customer experience - Since customers can easily pay their RMA balance without leaving the portal, this simplified process translates into a better customer experience.
- Improve exchange handling - When an exchange is approved, ReturnGO automatically creates a paid order, making the exchange process faster and more efficient.
How to Configure Portal Checkout
To enable portal checkout:
- Set up your Stripe integration. Learn how here.
- Go to Settings > Store Settings.
- Open the In-Portal Payments section.
- Enable the Portal Checkout toggle.
- Click on the save icon to save your changes.

How Portal Checkout Works
With portal checkout enabled, the flow will look like this:
- The customer creates an RMA through the ReturnGO portal.
- At the end of the regular portal flow, if the RMA requires payment such as fees or exchange price differences, customers see a checkout screen.
- Customers input credit card details on this checkout screen, which is powered by Stripe.

5. When there are price differences, the charge is captured when the exchange is released, and a regular order (not a draft order) is automatically created for the exchange items and marked as paid.
Exchanges
In the case of exchanges, once the exchange order is approved and released, a regular order, not a draft order, is created and marked as paid.
This order includes the exchange item and any associated fees, eliminating the need for separate invoices and ensuring a smooth transition from the return process to the fulfillment of the exchange order.
Note: If a customer returns an exchanged item that was paid for through Stripe, you’ll need to issue a refund manually through Stripe to process a refund to the original payment method. However, for store credit or alternative refund methods, the refund can be processed directly within ReturnGO as usual.
Charging Return Labels In-Portal
To set it so the return label must always be paid for in the portal, regardless of the return balance:
1. Go to Settings > Store Settings.
2. Open the General Returns section.

3. Set the Return Label Fee Payment setting to Always apply a separate charge for return label fees.
4. Click the save icon to save your changes.

If this setting is enabled and a return label fee is required, the customer will always need to pay it in the return portal.
Minimum Payment Threshold
You can set the minimum payment amount that can be processed through the portal checkout.
When the calculated amount due from the customer (for example, a price difference or deductible fee) is less than this value, the payment is automatically waived, and the customer will not be charged.
This setting helps you avoid small transactions for very low amounts.
Example:
- If the threshold is set to $1 and the total due from the customer is $0.75, the charge will be waived.
- If the total due is $1.50, the customer will be charged normally.
Note: The Minimum Payment Threshold applies only to payments processed through the portal checkout.
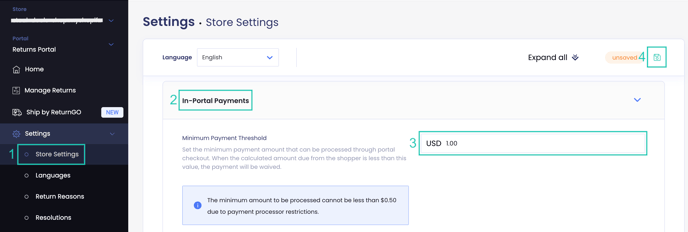
To configure the minimum payment threshold:
1. Go to Settings > Store Settings.
2. Open the In-Portal Payments section.
3. Set the Minimum Payment Threshold value.
Note: The minimum amount to be processed cannot be set lower than $0.50 due to payment processor restrictions.
4. Click the save icon to save your changes.
