ReturnGO API Overview
Last Updated: November 23, 2025
The ReturnGO API enables you to seamlessly integrate with any system or process in your eCommerce stack. This gives you the flexibility to choose the most suitable tools and processes for your business needs.
What is an API?
An API (Application Programming Interface) is a set of rules and protocols that allows different software applications to communicate and interact with each other.
The ReturnGO API is based on the REST API paradigm. You can review the full ReturnGO API documentation here.
By leveraging the API's endpoints and functionalities, you can connect various parts of the returns process including generating return shipping labels, validating returned items, and automating certain status updates.
You can leverage the ReturnGO API by using it when developing an application, or by using a no-code tool like Make or Zapier to build a workflow.
How to Access the API
To access the API, get your API key from the Settings > Integrations > API page.
This secret key serves as an authentication mechanism, ensuring that only authorized users can access the API.

Note: Make sure you add the authentication headers (API key and store name) to each API call, as defined in the API documentation.
Limitations
API Keys
You can create 1 API key per store owner.
API Calls
The default rate limit is 2000 calls per day and 5 calls per second. If you need a higher limit, contact ReturnGO support.
Tip: If you receive a 429 status code, you’ve reached the limit.
Multiple Stores
With ReturnGO, you can manage multiple stores using a single API key.
You can create one API key per store owner, not per store. Therefore, the same key can be used for multiple stores if you see the additional stores in the store selector in the ReturnGO dashboard - otherwise, you’ll need to create a separate key for the other owner/store.
Authentication
To authenticate the calls, an API key and a shop URL are required.
- To get an API key, go to Settings > Integrations > API.
- The same API key can work for all the stores on the same account.
- To find your shop URL, click on the "copy" icon next to your store name at the top of the ReturnGO dashboard. This will copy your shop URL (which is not visible) to your clipboard.

Second Portal API
Some stores have multiple portals, such as a return portal and a warranty portal. For these stores, ReturnGO API supports specifying the portal directly.
When using the ReturnGO API with multiple portals, the format to specify the portal is: shopname@portalname
Example: x-shop-name=demo-store.myshopify.com@Warranty_Portal
Where demo-store.myshopify.com is the store URL and Warranty_Portal is the portal name.
Note: If the portal name is not specified, then the first portal is used.
The portal name should be written exactly as it appears in the portals dropdown on your ReturnGO dashboard.

What Can You Use the API For?
You can use the ReturnGO API to streamline your workflow by creating custom integrations with your WMS, shipping, and return pickup systems, as well as your storefront and more.
Here are some examples of ways you can use the ReturnGO API:
1. WMS Integration
In order to sync between your warehouse and returns teams, you can use the API to build a custom integration with your warehouse management system, 3PL, or ERP.
Using the API, you can update the WMS when an RMA has been created, and then update ReturnGO when the item has been validated and processed at the warehouse.
Combined with approval, refund, and exchange automation, this enables you to fully automate the entire returns process regardless of the WMS you use, leaving only exceptions to be handled manually.
2. Shipping Integration
You can build custom shipping integrations using the API so that when an RMA is created, you can trigger your shipping carrier to generate a return shipping label that’s automatically sent to your customer as part of the approval email, along with the packing slip if configured.
3. Return Pickup Integration
The ReturnGO API enables you to integrate with third-party pickup services to provide return pickups for your customers, including generating a return pickup label when an RMA is created.
4. Storefront Integration
You can use the API to display RMA history and information on a customized customer account page.
ReturnGO's API enables you to connect virtually any way you like, enabling full automation and maximum flexibility in your return workflow.
5. Transaction Management
The ReturnGO API can be used to retrieve and update transactions related to your returns.
You can retrieve information about transactions made on ReturnGO, such as refunds, payment authorizations, payment captures, and invoice payments. You can also use the API to update ReturnGO about transactions made externally, such as refunds processed through an external platform.
This enables you to ensure that all your data remains consistent and synchronized.
6. Creating RMAs Externally
You can use the ReturnGO API to create Return Merchandise Authorizations (RMAs) externally.
This can be useful in cases where you want to create RMAs from an external platform, such as a warehouse application, custom-built portal, or bot.
7. Custom Dynamic Location
You can use the ReturnGO API to dynamically assign a return store location.
When an RMA is approved, ReturnGO sends an API request to your server with full order, customer, and item details. Based on this data, or just the order ID, your server returns the most appropriate return address.
This enables you to automate return routing to different store locations and streamline the return process without manual input.
Note: This feature can be enabled upon request.
How to Test the API
To test the API:
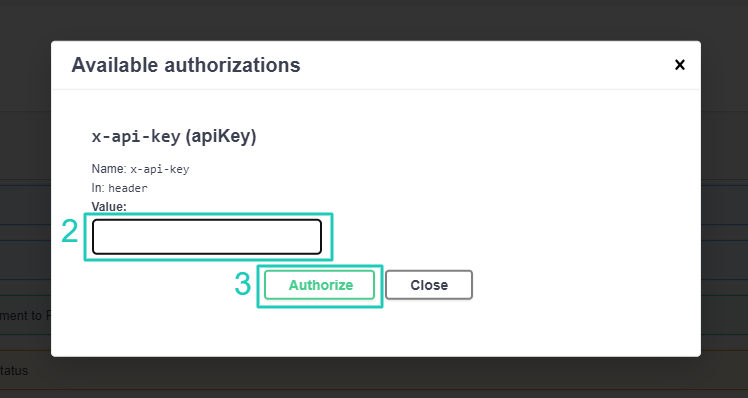
- Go to the API documentation swagger page and click on AUTHORIZE.

2. Paste your API key into the Value field.
3. Click AUTHORIZE.

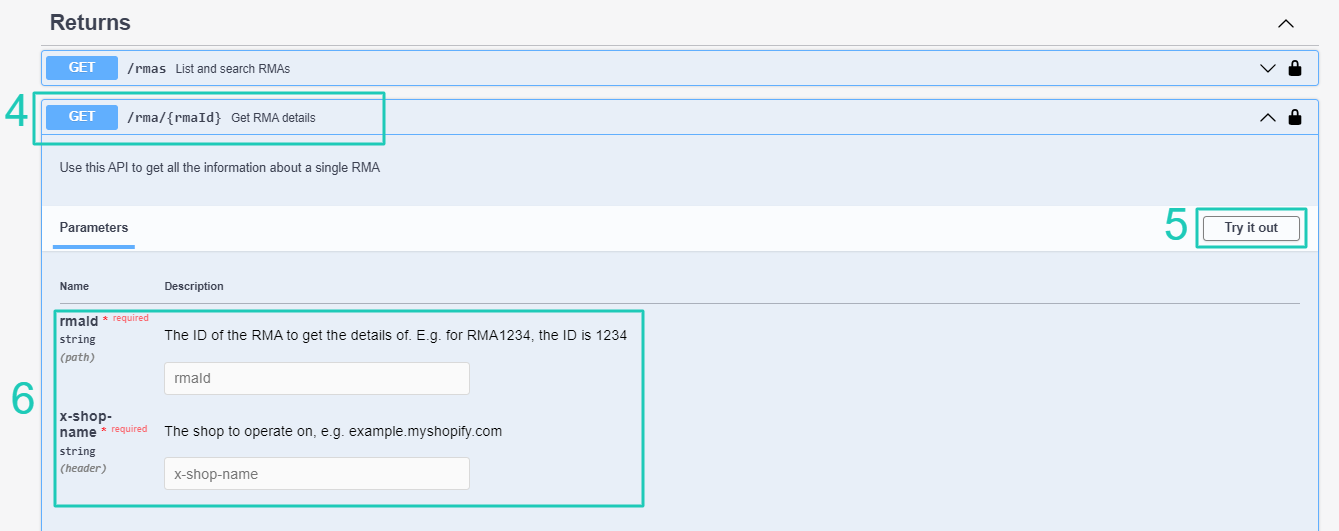
4. Click on an endpoint that you want to test.
5. Click TRY IT OUT. The fields will become editable.
6. Fill in the required fields.

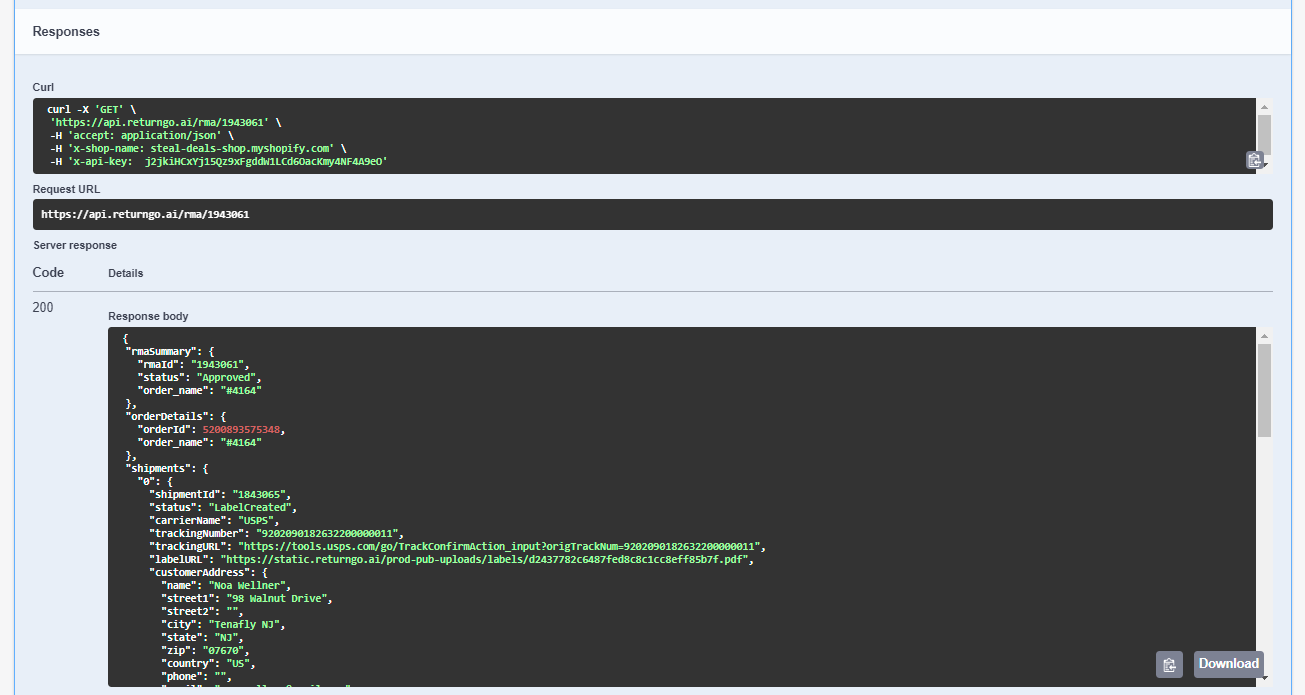
7. Click EXECUTE.

Below, under Responses, you can see whether the connection worked, and the results.

Notify-Only
When using the Notify Only feature, ReturnGO will not issue refunds. Instead, ReturnGO will notify you via the API when a refund needs to be processed.
This enables you to handle the refund through an external payment gateway (if your platform doesn't natively support refunds).
To enable Notify Only:
1. Go to Settings > Store Settings.
2. Open the API section.
3. Toggle the Notify About Refunds Instead of Issuing setting to enable the feature.
4. Select if you want ReturnGO to notify about:
- Refunds to payment methods
- Refunds to gift cards
- Refunds to store credit
5. Click on the save icon to save your changes.
