To embed your portal into a custom page and customize your styling in more advanced ways, it’s recommended to get the help of an experienced developer to implement these advanced customizations.
Table of Contents
Adding a Direct Link (Deep Link)
Embedding Store Credit Widgets
Embedding Your Portal
Instead of using ReturnGO’s built-in portal setup, you can embed your Edge portal into a custom page on your website. It’s important to note that the portal occupies the entire page, so to embed it on a custom page, you must ensure that the page has no other content, including a header or footer.
Note: Include the following line in your page template to prevent other scripts or layout elements from interfering with the portal: { % layout none % }
Embedding the Portal in a Custom Page
To embed the Edge return portal into a custom page, you need to create a new page template in your store theme using the theme editor.
The script and <div> must be added directly into this new template. Be sure to include the { % layout none % } flag in the template to:
- Load the correct Edge portal script
- Ensure the portal displays in full-page mode without a header or footer
This ensures the portal loads correctly in full-page mode without interference from other scripts or layout elements.
To embed the return portal in a custom page, simply add this line to your theme in the place where you want the portal to appear:
<div id="ReturnGOPortalEmbedding"></div>
For Shopify Liquid stores, add the following line to the page to ensure the page has no other content, including a header or footer.
{% layout none %}
Embedding the Portal in an HTML Page
This method lets you embed the portal into any custom page. You can also use it if you have a non-Shopify, headless, or custom storefront setup (e.g., SFCC, Hydrogen).
To embed your portal into an HTML page:
1. Add these lines to the page HEAD section of your new page:<script src="https://portal.returngo.ai/portal.js" defer="defer"></script>
<script type="application/javascript">
window.ReturnGO = {
shop: 'shopname.myshopify.com', //Your shop URL
};
</script>
2. Add this line to the page BODY section where you want the portal to appear:
<div id="ReturnGOPortalEmbedding"></div>
Embedding the Portal in a SPA (Single Page Application)
For single-page applications, you can follow the previous steps for embedding the portal in an HTML page with one additional step:
- Add this line before the js script is added:
window.returnGoCanBeRun = true;
For example, in a React app, the portal component might look like this:
export default function ReturnPortal() {

  useEffect(() => {


    const script = document.createElement('script');

    script.src =

      'https://portal.returngo.ai/portal.js';

    script.async = true;

    window.returnGoCanBeRun = true;

    document.body.appendChild(script);

    window.ReturnGO = {

        shop: 'shopname.myshopify.com', //Your shop URL

    };


    return () => {

      document.body.removeChild(script);

    };

  }, []);


 return (

    <div

     id="ReturnGOPortalEmbedding"

      style=

    ></div>

  );

}
Embedding a Second Portal
Some stores have multiple portals, such as a return portal and a warranty portal. For these stores, we support specifying the portal directly, allowing the hosting of the portal on any web page. This enables more flexibility in managing multiple portals.
When using a custom portal page, you need to provide a shop variable to specify the store. If you have multiple portals, you need to specify the portal as well.
To specify that you are referring to the non-main portal, use the shopname@portalname format in the shop: variable when embedding the portal, instead of just the shop name.
Example: shopname.myshopify.com@Warranty_Portal
Where shopname.myshopify.com is the store URL and Warranty_Portal is the portal name.
Here’s an example of embedding a second portal:
<script

src="https://portal.returngo.ai/portal.js"

defer="defer"></script>

<script type="application/javascript">

    window.ReturnGO = {

        shop: 'shopname.myshopify.com@Warranty_Portal', //Your shop URL and portal name

   };


</script>
Note: If the portal name is not specified, the first portal will be used. Ensure the portal name matches exactly as it appears in the portals dropdown.
Platform-Specific Implementation
Follow your platform implementation guide, and replace any ReturnGO portal scripts with https://portal.returngo.ai/portal.js.
Adding a Direct Link (Deep Link) to Return an Order from the Account or Order Pages
You can add a direct link (deep link) to the return portal that opens a specific order automatically. This is useful if you want to add a “Return” button on your account or order pages that takes customers directly to their order inside the return portal.
Here’s an example of how to add a “Return” link from the account or order pages. This example is based on the Debut theme. Keep in mind that your specific page and paths may be different.
<table class="responsive-table">
<thead>
<tr>
<th scope="col">{{ 'customer.orders.order_number' | t }}</th>
<th scope="col">{{ 'customer.orders.date' | t }}</th>
<th scope="col">{{ 'customer.orders.payment_status' | t }}</th>
<th scope="col">{{ 'customer.orders.fulfillment_status' | t }}</th>
<th scope="col">{{ 'customer.orders.total' | t }}</th>
<th scope="col">Action</th>
</tr>
</thead>

<tbody>

</tbody>

</table>
To clarify, the only code above that is specific to ReturnGO is the link to the portal, including the order ID and email parameters:
<a href="/a/return?orderId={{ order.name | url_encode}}&email={{ order.email |url_encode}}">Return</a>
Creating a Multi-Store Portal
To create a multi-store portal where customers can submit their return requests for any of your stores, use the following code snippet.
This code snippet is an example of how to create a portal with store-selection logic.
Paste this snippet into your custom portal page, instead of the default custom portal code. Make sure to edit the code to match your use case - specifically, implement the store selection logic that applies to your business where it says "TODO".
 <div id="getOrder">
    <h1>Enter Your Order Number</h1>
    <form id="orderForm">
        <label for="orderNumber">Order Number:</label><br>
        <input type="text" id="orderNumber" name="orderNumber"><br>
        <input type="submit" value="Submit">
    </form>

    <script>
        // Get a reference to the form element
        const form = document.getElementById('orderForm');

        // Add an event listener for the submit event
        form.addEventListener('submit', function(event) {
            // Prevent the form from being submitted
            event.preventDefault();

            // Get the value of the orderNumber input field
            const orderNumber = document.getElementById('orderNumber').value;
            const getOrder = document.getElementById('getOrder');
            getOrder.hidden = true;
            // Print the order number to the log
            console.log(orderNumber);

            let shop = undefined;
            //TODO: adjust this store selection logic as needed
            if (orderNumber.endsWith('_1')) {
                shop = "my-first-store.myshopify.com";

            } else if (orderNumber.endsWith('_2')){
                shop = "my-second-store.myshopify.com";

            } else if (orderNumber.endsWith('_3')){
                shop = "my-third-store.myshopify.com";

            } else {
                //TODO: adjust the error message as needed
                alert("Please make sure to type the full order number in the format #12345_1");
                getOrder.hidden = false;
            }

            if (shop) {
                if (!window.ReturnGO) {
                    window.ReturnGO = {}
                }

                window.ReturnGO.shop = shop;
                const portalDiv = document.createElement('div');
                portalDiv.id = 'ReturnGOPortalEmbedding';

                const placeholder = document.getElementById('placeholder');
                placeholder.appendChild(portalDiv);
                const scriptTag = document.createElement('script');
                scriptTag.src = `https://static.returngo.ai/master.returngo.ai/returngo.min.js?shop=${shop}`;
                placeholder.appendChild(scriptTag);
                const currentUrl = window.location.href;

                // Create a new URL object from the current URL
                const url = new URL(currentUrl);

                // Use the URLSearchParams object to set the "param" parameter
                const params = new URLSearchParams(url.search);
                params.set("orderId", orderNumber);

                // Update the URL object with the new search parameter
                url.search = params.toString();

                window.history.pushState({}, "", url);
            }
        });
    </script>
</div>
<div id="placeholder"></div>
Embedding the Store Credit Widget
To embed the ReturnGO widget that shows customers their store credit balance into a specific place on the cart or account page, simply add the appropriate line to your theme in the place where you want the panel to appear.
Note: The account and cart panels are only visible for customers who have received store credit from ReturnGO.
For the account panel:
<div id="ReturngoAccountEmbedding"></div>
For the cart panel:
<div id="ReturngoCartEmbedding"></div>
Hiding the Store Credit Widget
To hide the store credit widget, add the appropriate line to your theme.
For the account panel:
<style type="text/css">#returnGoAccountWidget { display: none; }</style>
For the cart panel:
<style type="text/css">#returnGoCartWidget { display: none; }</style>
CSS Style Customization
To style your portals in more advanced ways than possible natively through ReturnGO’s portal customization settings, you can add custom CSS code for more advanced styling.
Portal Isolation
The ReturnGO portal has two modes of embedding:
- Isolated mode (default for new stores since Feb 2024)
- Non-isolated mode (default before Feb 2024)
In isolated mode, the portal is not affected by any code in the hosting web page. This means that whatever styles you have on your returns website page would not leak into the portal. The opposite is also true: the portal styles, and any CSS customization you push into it, cannot leak into your returns page.
To customize your portal style in isolated mode:
- Go to Settings > Portal > Look & Feel.
- Open the General Settings section.

- Open the Advanced sub-section.
- Make sure the Isolated Portal toggle is on.
- Paste your custom CSS into the Custom CSS field.
- Click the save icon to save your changes.
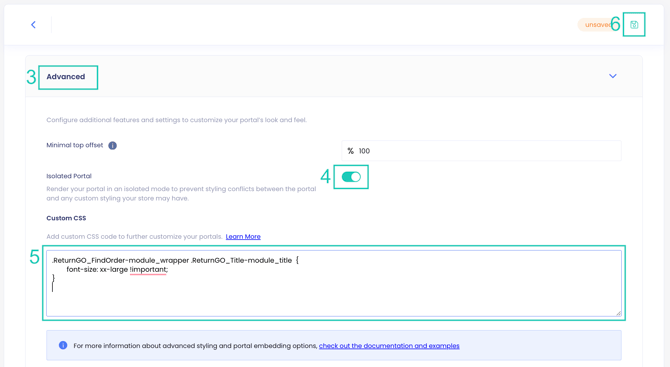
Tip: When pasting custom CSS into the dashboard, make sure to use proper CSS syntax and not HTML markup.
In non-isolated mode, the portal is affected by styles from the host page. This may cause conflicts and therefore the recommended mode is isolated mode. Note that in non-isolated mode, styles can still be placed on the host page.
All the style examples given here are intended for use in custom CSS in isolated mode. To use them in non-isolated mode, make sure to place them in a style element.
Custom Style Examples
Here are a few examples of customizations you can do using custom CSS.
Hide the Original Price in the Return Portal
To hide the original price displayed in the return portal, add the following lines to your Custom CSS box:
.product-card-body__originalPrice {
  display: none !important;
}
.root-1d4700t {
  display: none !important;
}


Change the Size of Radio Buttons/Checkboxes
To adjust the size of radio buttons and checkboxes, add these lines to the Custom CSS box, replacing “1.5” with the relevant number:
#returnGoAssistant #returnGoPopup .ReturnGO_CheckBox-module_checkmarkContainer {
transform: scale(1.5);
}

#returnGoAssistant #returnGoPopup .ReturnGO_RadioButton-module_checkmark,
    #returnGoAssistant #returnGoPopup .ReturnGO_RadioButton-module_checkmarkChecked {
    transform: scale(1.5);
}
Change Font Sizes
To adjust the font sizes, add these lines to your theme, replacing “12” with the relevant number:
#returnGoAssistant #returnGoPopup * {
        font-size: 12px !important;
}

#returnGoAssistant #returnGoPopup .ReturnGO_InputField-module_input {
        font-size: 12px !important;
}
Remove Opacity from the Find My Order Button When Disabled
To remove the opacity from the Find My Order button when disabled (before the order information is inputted), add these lines to your theme:
#returnGoAssistant .ReturnGO_Button-module_button.ReturnGO_Button-module_disabled, #returnGoCartWidget .ReturnGO_Button-module_button.ReturnGO_Button-module_disabled, #returnGoAccountWidget .ReturnGO_Button-module_button.ReturnGO_Button-module_disabled {
    opacity: 1 !important;
}
Hide Collection Images in Product Search
If you're using Browse by Collection in product exchanges and don't want to set a collection image on your eCommerce store, you can hide the collection images through advanced customization.
To hide collection images, add the following lines of custom CSS on your ReturnGO dashboard:
#returnGoAssistant .ReturnGO_CollectionListItem-module_listItem img {
    display:none
}
Additional Useful Class Names
Layout
- Header: ReturnGO_Header-module_header
- Body: ReturnGO_Common-module_content
- Footer: ReturnGO_Footer-module_footer
Button
ReturnGO_Button-module_button
- Disabled: ReturnGO_Button-module_disabled
- Small: ReturnGO_Button-module_sm
- Medium: ReturnGO_Button-module_md
- Primary: ReturnGO_Button-module_primary
- Secondary: ReturnGO_Button-module_secondary
Input
ReturnGO_InputField-module_input
- Error: ReturnGO_Button-module_error
- Label: ReturnGO_InputField-module_label
Checkbox
ReturnGO_CheckBox-module_checkBox
- Checkmark container: ReturnGO_CheckBox-module_checkmarkContainer
Radio Buttons
ReturnGO_RadioButton-module_radioButton
- Checkmark: ReturnGO_RadioButton-module_checkmark
- Checked checkmark: ReturnGO_RadioButton-module_checkmarkChecked
Troubleshooting
Portal Not Loading or Stuck on Loading Screen
If your return portal is stuck on the loading screen or does not start properly, this may be caused by theme-related issues, particularly in custom or Vue-based themes.
For example, adding the ReturnGO script directly inside a Vue template can prevent the script from executing correctly, which stops the portal from loading.
Ensure that the ReturnGO script is placed outside of any Vue or app container to avoid conflicts.
Note: Contact your theme developer to review and fix the theme or page template.
Once the template issue is resolved, the portal should load normally.