Edge is ReturnGO’s ultimate return portal, providing a visually rich, responsive return experience designed with a modern aesthetic for use across all devices.

Requirements
This portal is the default for all merchants installing after April 28th, 2025.
If you already use ReturnGO and want to switch to Edge, please contact support.
- Any ReturnGO plan
Capabilities
- All standard return portal capabilities
- Displays eligible resolutions based on return reasons
- Grouping multiple instances of the same item
- Manual exchanges
- Prompt shoppers to rate their return experience
- RTL languages
- Shop Now exchanges
- Tracking portal
Limitations
The following features are not yet supported:
- Display SKU for product items
- Display descriptions for item actions
- Multiple labels per shipment
Note: ReturnGO is actively working to incorporate these features.
Customizing the Portal
- Backgrounds
- Cover images
- Fonts and colors
- Text styles
- Buttons and bars
- Feedback indicators
Learn more about portal customization here.
Edge Portal Texts Translations
Note: Customizing text via the Portal > Content page is not yet supported for the Edge portal.
- Go to Settings > Languages.
- Click DOWNLOAD FILE.
- Edit texts in the CSV file using spreadsheet software.
- Save as CSV.
-
Click UPLOAD FILE to import.

Note:
- Enable all languages before downloading the CSV.
- Classic and Edge portals use different translation files—update accordingly.
Customer Portal Flow
The Edge portal is designed to provide a smooth and intuitive return experience for your customers, guiding them step-by-step through the return process.
To view the portal flow and the customer experience, learn more in the Edge Portal Flow article.
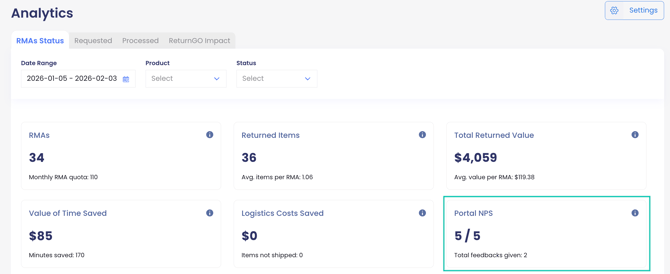
Shopper Rating
At the end of the return flow, customers are prompted to rate their return experience on a 1–5-star scale. Ratings are sent to Mixpanel with filters by return type, score, and store.
This feature can be enabled upon request.

This rating step is available on both desktop and mobile, enabling you to gather valuable feedback and gain insights into the customer experience.
You can see the average Net Promoter Score (NPS) and the total number of times feedback has been submitted directly in the Returns Analytics page of the dashboard.
Return Requests for Unfulfilled Orders
The Edge portal supports returns only after an order has shipped. If a customer tries to initiate a return before the order is fulfilled, the portal displays a message: "You can't request a return until your order has shipped."
Resolution Behavior
Since customers select their return reason before selecting the resolution, the Edge portal displays only the resolutions that are eligible for the selected return reason, as configured in your policy rules. This ensures that customers are only offered relevant options.
When customers choose to exchange an item, the exchange selector displays only options that are currently in stock, hiding or disabling out-of-stock variants. This prevents failed exchanges and ensures customers can only select valid replacements.
Multiple Policies Using the Same Refund and Return Method
When multiple return policies are eligible for the same item and share the same refund method type (for example, refund to original payment method, store credit, or gift card) and the same return method, the Edge portal does not display each policy separately.
Instead, the Edge portal groups these policies into a single option and automatically selects the most beneficial offer for the customer, based on the calculated refund value.
- If one policy results in a higher refund amount than another, only the higher-value option is presented.
- If multiple eligible policies result in the same refund value, the Edge portal presents a single option, and the selected policy may vary.
Tip: To ensure distinct resolution options appear in the Edge portal, you should differentiate policies using additional criteria such as return reasons, item conditions, product attributes, or other eligibility rules.
Advanced Embedding Options
Instead of using ReturnGO’s built-in portal setup, you can embed your Edge portal into a custom page on your website. It’s important to note that the portal occupies the entire page, so to embed it on a custom page, you must ensure that the page has no other content, including a header or footer.
For full instructions on all embedding options, including embedding in a custom page, HTML page, SPA, and multi-portal setups, see the Advanced Styling Customization article.
Note: If the portal name is not specified, the first portal will be used. Ensure the portal name matches exactly as it appears in the portals dropdown.
Edge Portal FAQs
Is there a way to remove the “Replacement” option on the Edge portal?
No. The Replace option is part of the variant exchange functionality. If you offer variant exchanges, the Replacement option is automatically included and cannot be disabled independently. However, you can customize the text displayed for this option on the portal.
Can I disable the Shop Now feature for product exchanges on the Edge portal?
No, because product exchanges on the Edge portal always use the Shop Now flow.
Why is the exchange credit widget not appearing during a product exchange?
The exchange credit widget appears only when Shop Now is enabled. Ensure it is enabled for the widget to display.
What is the character limit for product names in the Edge portal?
There is no character limit for product names or titles displayed in the Edge portal.