The Ship with pre-paid label return method enables you to send a pre-paid label to your customers that they can use to ship their items back.
For the best experience, it is recommended to use Ship by ReturnGO, ReturnGO’s built-in shipping solution. Ship by ReturnGO is available on all plans and requires no integration, enabling you to easily generate and manage pre-paid return labels directly within your ReturnGO account.
Alternatively, on most plans, you can also connect third-party shipping providers to generate pre-paid labels. ReturnGO integrates with a wide range of shipping platforms, which you can link through your account settings.
View a full comparison of which shipping integrations support which features such as QR codes or international returns.
If a carrier is available in your shipping account but does not appear in the carriers list in ReturnGO:
- The carrier does not support return labels.
- The carrier is not set for return labels in the carrier settings.
Note: ReturnGO enables you to generate return labels and connects you to carriers, but does not operate as the carrier. The carrier is responsible for pickup and delivery. For questions about pickup scheduling, delays, or tracking, contact the carrier directly.
Configuring Ship with Pre-Paid Label Return Methods
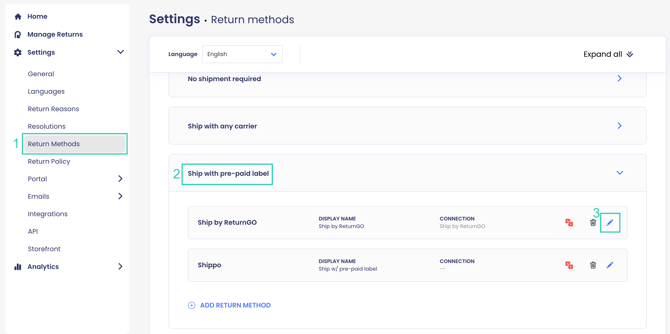
To configure ship with pre-paid label return methods:
- Go to Settings > Return Methods.
- Open the Ship with Pre-Paid Label section.
- Click the pencil icon next to the return method you want to edit.

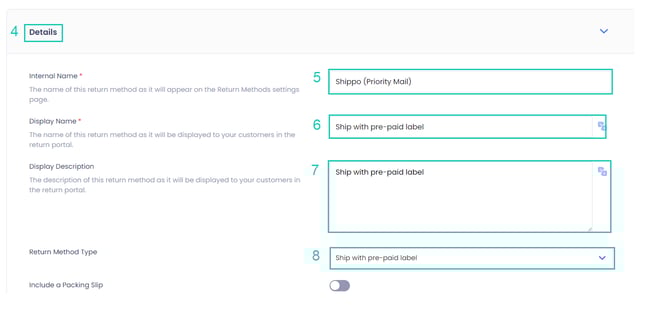
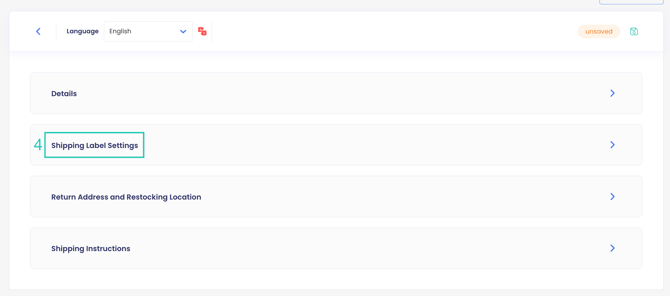
4. Open the Details section.
5. Set the Internal Name.
6. Set the Display Name.
7. Set the Description.
8. Select Ship with Pre-Paid Label as the Return Method Type.
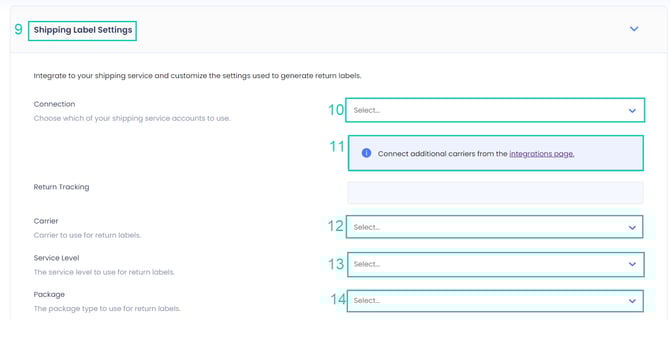
9. Open the Shipping Label Settings section.
10. Set the Connection to the shipping solution you want to use.
Note: If you are using a third-party shipping, the only options you’ll see in this drop-down are shipping integrations that you’ve already connected in the Integrations page.
11. Select the Carrier to use for return labels.
-
- Note that to offer QR codes you must select a carrier that supports QR codes.
12. Select the Service Level for return labels, which defines delivery parameters like duration, mode, and costs.
13. Choose the Package Type to use the pre-defined package dimensions supported by the carrier. This field only appears if the service carrier you choose has preset package dimensions. The package type is ignored if you set custom package dimensions.
14. Enable the Generate Forward Shipping Labels toggle to create a forward shipping label regardless of whether return labels are supported.
15. Enable the Require Recipient Signature toggle to ask for a signature upon delivery.
16. Set the Default Customer Company (optional).
Note: Some shipping aggregators require a company name in the customer’s address. This field will be used as a fallback when no company name is defined in the customer’s address on your store platform.
17. Enable the Ignore Address Validation toggle to skip address validation when generating a shipping label.
Note: If a return is being shipped via Australia Post, the Address Validation screen will appear even if the Require customers to validate address setting is disabled in the applicable policy rule.
18. Select the Label Type to send a printable label, a QR code for drop-off, or both.
Note: When setting a return method to use QR codes, make sure the selected carrier and service support QR code returns. Upon RMA creation, if a QR code can't be obtained, a printable label will be sent instead.

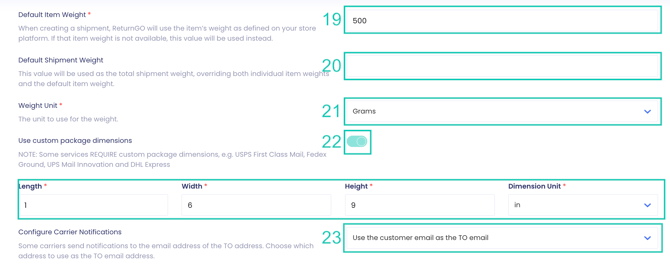
19. Set the Default Item Weight.
Note: ReturnGO will use the item’s weight as defined on your store platform. If that item's weight is not available, this value will be used instead.
20. Set the Default Shipment Weight.
Note: This value will be used as the total shipment weight, overriding both individual item weights and the default item weight.
21. Select the Weight Unit to define the unit of measurement for weight (e.g., grams).
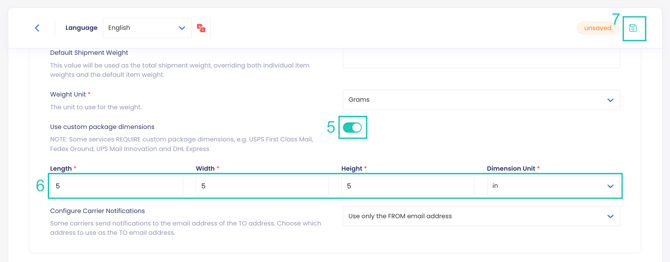
22. Enable the Use Custom Package Dimensions toggle to set the length, width, and height of your packages. Length is the longest dimension, usually in inches.
23. Choose which address to use as the TO email address.
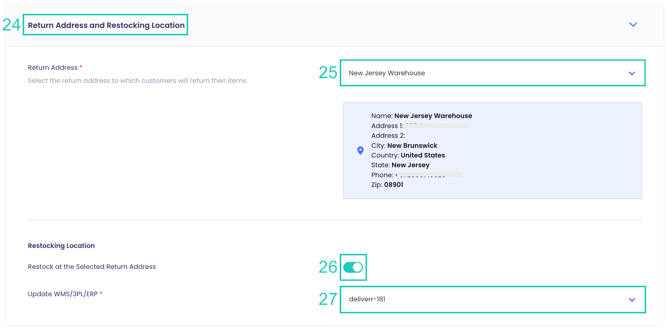
24. Open the Return Address and Restocking Location section.
Note: The default return address is the store address as it is defined in your eCommerce store.
25. Review and update your return address, which will be printed on the return label sent to your customers.
26. Enable the Restock at the Selected Return Address toggle to restock returned items at this address.
Note: If you do not restock at the selected return address, set a Restocking Location instead.
27. Select whether to update WMS/3PL/ERP to ensure your connected warehouse or fulfillment system is updated with return data.
Note: The rest of the settings may vary depending on the connected shipping carrier.
28. Open the Shipping Instructions section.
29. Edit the content of the instructions that will appear in the approval email for this return method.
You can use the following variables in your shipping instructions:
- {qr_code}: Adds the image of the QR code. Include only if a QR code is provided with this return method.
- {print_label_button}: Adds a button to download the return shipping label. Include only if a printable label is provided with this return method.
Tip: If the selected service requires booking a pickup, you or your customer must arrange the collection directly with the carrier. You can use the Shipping Instructions section to provide customers with guidance on how to arrange a pickup.
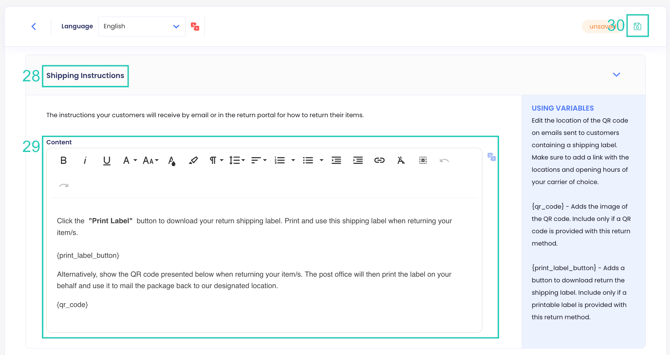
Note: Make sure to add a link with the locations and opening hours of your carrier of choice so the customer knows where to take their package to send it back.
Once set, you can start using the return method you just configured in your policy rules.
Custom Package Dimensions
Custom package dimensions are used when the Use Custom Package Dimensions setting is enabled, and no package type is selected in the return method.
If a package type is chosen, the system uses the predefined dimensions associated with that package type instead of the custom values entered.
If custom dimensions are configured in the return method, those dimensions will be used for all return labels created with that return method, even if the actual items being shipped vary in size.
Note: The system does not determine package dimensions automatically. The dimensions used for the return label are based only on what is configured in the return method.
Custom dimensions are required for some services.
To set custom package dimensions:
- Go to Settings > Return Methods.
- Open the Ship with Pre-Paid Label section.
- Click the pencil icon next to the return method you want to edit.
- Open the Shipping Label Settings section.
5. Enable the Use Custom Package Dimensions toggle.
Note: Ensure that Package Type is not selected. Custom package dimensions are only used if Package Type is not selected.
6. Enter the Length, Width, and Height of the package.
7. Click the save icon to save your changes.
Label Type Behavior
When you choose auto-select-cheapest in the service level, the system automatically selects the most affordable shipping option, overriding any other preferences you've set.
Your connected shipping provider generates shipping labels, and the label format, such as a printable label or a QR code, depends on what the selected carrier and service level support.
Example:
If auto-select-cheapest is enabled and the cheapest shipping option uses QR codes, you'll receive a QR code label even if you previously specified a different label type preference. The cost-saving setting takes priority over label format preferences.
Troubleshooting
No Available Rates
If you receive a no available rates error when generating a pre-paid label, it usually means that the selected carrier services are not available for the shipment’s origin, destination, weight, or dimensions.
This can occur if you enable only very specific pickup or collection services that are not supported for certain addresses.
To resolve this:
-
Enable a broader set of service levels.
-
Or select auto-select-cheapest from a wider list of eligible services.
-
Review the shipment weight and package dimensions to ensure they match the carrier’s requirements.
After adjusting the available services, try generating the label again.
Using Amazon MCF
When using Amazon MCF for returns, cost-based return label fees are not supported. You must configure a fixed return label fee. If cost-based fees are configured while using Amazon MCF, the return label may not be generated.