Wallet provides a flexible, platform-independent way for you to pay for ReturnGO labels using preloaded credits. You can add credits to your Wallet and set up automatic recharges to ensure you don’t run out of funds. This offers more control and visibility over your label costs without relying on platform-based billing.

Requirements
To use the Wallet feature, you need:
- A valid payment method for recharging the Wallet.
- Ship by ReturnGO return method.
Note: Wallet access is only available if you have a Ship by ReturnGO return method. If you do not have this return method enabled, please contact ReturnGO support to request access.
What Is Your ReturnGO Wallet?
The Wallet is a prepaid balance used to pay for return shipping labels generated through Ship by ReturnGO.
As soon as you configure a payment method for your Wallet, label charges will automatically be deducted from your Wallet instead of any other billing method, such as your eCommerce platform (e.g., Shopify).
Note: Wallet transaction notifications are sent to the store owner email associated with your ReturnGO store.
Using the Wallet provides a convenient alternative to standard billing methods, making it easier to manage all your label charges in one centralized location.
Note: Only return label charges are paid through your Wallet. All other ReturnGO charges, such as subscription plan payments and excess RMAs, will continue to be billed through your existing billing setup (such as Shopify billing or invoice).
To avoid any issues with label generation, make sure to always keep enough credits in your Wallet. If there aren't sufficient funds in the Wallet to generate the required label, an error will appear and the label won’t be generated.
You can either add credits manually or configure automatic recharge settings based on your balance.
Tip: Enjoy $50 bonus credits the first time you charge your Wallet!
Wallet Overview
Your Wallet activity and balance are visible on the Billing page of your ReturnGO dashboard.
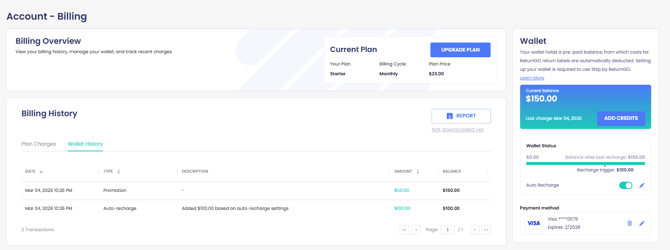
The Wallet section includes:
- Current Balance: The total amount of pre-paid credits available in your Wallet to pay for ReturnGO labels. The Wallet has a balance limit of $2,000 (or equivalent in your store currency).
Note: You can only add credits if the total Wallet balance remains within this limit. If adding additional credit would exceed the limit, the action will not push through, and you will be notified.
- Last Charge Date: The date your Wallet was last recharged.
- Auto Recharge Toggle: Indicates if auto-recharge is ON or OFF.
- Edit Button: Enables you to update your auto-recharge settings.
- Add Credits Button: Enables you to add credits manually with a one-time recharge.
- Wallet Status: Shows a status bar indicating how much credit you’ve used since your last recharge.
- Includes key markers:
- $0
- Recharge trigger: If Auto-Recharge is enabled, the status bar indicates how close you are to the next recharge trigger.
- Balance after last recharge: The total amount in your Wallet right after your most recent recharge. This includes your previous balance plus the amount you recharged.
- Includes key markers:
- Payment Method: Displays your saved card info with options to update or delete.
How It Works
When a return label is created, ReturnGO calculates the expected label cost based on your configuration (e.g., $5). This amount is reserved from your Wallet balance at the time of label creation.
Once the label is generated, the cost is confirmed and deducted from your Wallet.
If your Wallet does not have enough balance to cover the full label cost, ReturnGO first deducts the available amount from your Wallet and bills the remaining amount through your eCommerce platform billing.
In Wallet History, the amount deducted from your Wallet appears as a Label creation transaction, and the remaining amount may appear as a Debt transaction.
Note: The Balance column shows your Wallet balance after the transaction is processed. Because of this, you may see Label creation and Debt entries even when the displayed balance is $0.00.
Multiple Wallets for Different Portals and Stores
Each ReturnGO portal has its own separate Wallet. If you have multiple portals on your ReturnGO account, you need to set up a Wallet for each portal separately.
For example, you can set up a Wallet for your US portal with one payment method, and a different Wallet with a separate payment method for your UK portal.
Wallet settings and balances are independent across portals and stores, giving you flexible control over how you manage label payments in different regions or business units.
Multi-Store Plans With Centralized Billing (Parent-Child Store Wallets)
If you have multiple stores under one ReturnGO plan (also referred to as a parent-child store), each store has its own independent Wallet with a separate balance and payment method.
Label charges are first deducted from each store’s Wallet, if one is configured and has sufficient funds. If a store does not have its own Wallet, or if the Wallet balance is insufficient (for example, due to a higher label cost or a label adjustment), the remaining amount is billed through the parent store’s eCommerce platform. This ensures that all outstanding charges are consolidated under the parent store’s billing cycle.
This setup allows for centralized billing while still maintaining independent Wallets per store.
How to Set Up Your Wallet
To configure your Wallet:
- Go to Settings > Billing.
- In the Wallet section, click SET UP NOW or ADD PAYMENT METHOD.
Note: This will open the pop-up to add a payment method.
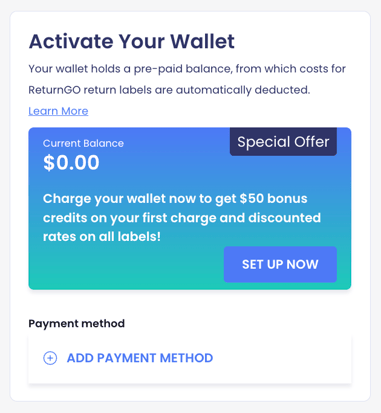
3. Add your credit card details and click SAVE CARD.
Note: Your payment details are not stored by ReturnGO. Payments are securely processed via Stripe.

4. Set the Minimum Balance Threshold that will trigger a recharge.
Tip: If you expect to generate a high volume of shipping labels, consider increasing your auto-recharge amount to help maintain a sufficient Wallet balance for label creation.
5. Set the Recharge Amount to be added when your balance falls below the threshold.
- Minimum Recharge Amount: $100 (Or equivalent in your store currency)
- Maximum Recharge Amount: $2,000 (Or equivalent in your store currency)
Note: Make sure the Recharge Amount is equal to or greater than the Minimum Balance Threshold to avoid your balance dropping below the minimum again shortly after recharging.
7. Click CONFIRM to save your settings and add the initial credit amount to your Wallet.

Your Wallet balance will be updated immediately.
Note: When your Wallet balance falls below the Minimum Balance Threshold, your saved payment method is automatically charged the Recharge Amount.
Manually Adding Wallet Credits
To manually add credits to your Wallet:
- Go to Settings > Billing.
- In the Wallet section, click ADD CREDITS.

- Enter the one-time amount you want to add.
-
- Minimum amount: $50 in your store currency
- Maximum amount: $2,000 in your store currency
-
- Click CONFIRM to charge the amount and add the credits to your Wallet balance.

Your Wallet balance will be updated immediately.
Turning Off Auto-Recharge
To turn off auto-recharge:
- Disable the auto-recharge toggle.

- Click DISABLE AUTO RECHARGE in the confirmation pop-up.
Note: Disabling auto-recharge means your Wallet won’t be automatically topped up with credits anymore. If your balance gets too low, you may have issues creating ReturnGO labels.

Removing a Payment Method
To stop using the Wallet for label payments, you can remove the connected payment method from your Wallet. As long as a payment method is connected, ReturnGO assumes label charges should be deducted from your Wallet balance.
To remove a payment method:
- Click the trash icon next to the saved payment method.

- Click REMOVE PAYMENT METHOD in the pop-up.
Note: Removing your payment method will prevent you from adding credits to your Wallet. Any remaining balance will still be used to generate labels. Any label cost that cannot be deducted from your Wallet balance will be charged via your eCommerce platform’s billing.

Handling Payment Method Errors
If there's a problem charging your payment method, an orange bar will appear at the top of your Billing page letting you know that a payment failed.
If auto-recharge fails, ReturnGO will automatically retry the charge up to 5 times, and you will receive an email notification after the first failed recharge attempt.

- Click MORE DETAILS to view the exact error/s.
- If a charge fails, this pop-up also shows retry attempts. ReturnGO will automatically retry charging your payment method.
- Click UPDATE PAYMENT METHOD to add a different payment method.
- Updating the payment method is the quickest way to ensure successful payment.
- After updating the payment method, the system will automatically retry the payment.
- Click TRY AGAIN to retry charging.
- If you’ve resolved the issue with your current payment method, attempt the same charge again.

Billing History
On the Billing page, you can see all Wallet transactions.
Click Wallet History to see all Wallet-related transactions, such as credits added, auto recharges, and label charges.
In the Wallet History section, you'll see the following columns:
- Date: The date and time when the transaction occurred.
- Type: The type of transaction, such as Recharge or Label creation.
- Description: Shows details about the transaction, including the RMA number if relevant. Clicking the RMA number will take you to the relevant RMA page.
- Amount: The amount of the transaction. Amounts added to your Wallet appear in green. Amounts deducted from your Wallet appear in red.
- Balance: Your Wallet balance after that transaction was processed.

Note: You’ll receive an email receipt from Stripe each time your Wallet is auto-recharged. Receipts are sent to the store owner email associated with your ReturnGO account.
Wallet Transaction Types
The following transaction types may appear in your Wallet History:
-
Auto-recharge: Credits automatically added to your Wallet when your balance falls below the minimum balance threshold.
-
Manual deposit: A one-time amount you add to your Wallet manually.
-
Label creation: The cost deducted from your Wallet when a return label is created.
- Debt: The remaining portion of a label cost that could not be covered by your Wallet balance. This amount is billed through your eCommerce platform billing, such as Shopify.
-
Refund: A credit returned to your Wallet, for example when an unused label is voided.
Downloading Wallet Transaction Reports
You can download a detailed report of your Wallet transactions from the Billing page.
To download your wallet transaction report:
- Click on WALLET HISTORY.
- Click on the REPORT button.
