Integrating Your Return Portal to Your Shopify Store
Last Updated: February 4, 2026
To add a return portal to your store, you need to integrate ReturnGO into your Shopify store and add the return portal to your site.
Tip: Looking for information on how to install ReturnGO on Shopify? Click here.
Capabilities
As part of the return portal integration, you can:
- Enable the integration to your Shopify store.
- Set up a proxy path for your return portal.
- Generate a return portal URL.
- Add a custom portal URL for hosting the return portal on a custom page.
How to Integrate ReturnGO into Your Store
To integrate ReturnGO with your Shopify store:
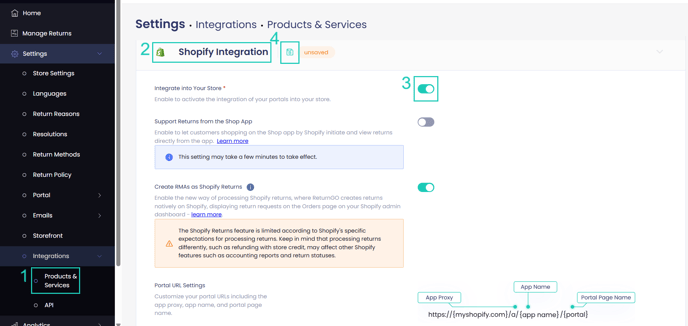
- Go to Settings > Integrations > Products & Services.
- Open the Shopify Integration section.
- Enable the Integrate into Your Store toggle.
- Click on the save icon to apply changes.

By following the steps above, your return portal will be integrated into your store.
Note: You will need to have at least one return method and one policy rule set up before you can enable the Shopify integration.
On this page, you can also customize your return portal URL and copy the full portal URL that you can link to from your return policy, product pages, emails, and more.

The return portal URL can also be found on the home page of your ReturnGO dashboard.

Adding Your Portal to Your Store Site
To add your return portal URL to your Shopify store:
-
Log in to your Shopify store admin.
-
From your dashboard, click on Online Store > Navigation.
-
Choose where you would like to place the return portal (i.e header, footer).

-
Click on ADD MENU ITEM.
-
Enter the desired display name for your return portal (i.e Start a Return, Return Portal, Returns & Exchanges)
-
Enter the return portal link.

-
Click ADD
-
Click SAVE.

Optimizing Script Loading for Your Store
By default, ReturnGO loads a script across all pages of your store to ensure full functionality, including features like Cart Widget, Credit Widget, and Shop Now.
If you're looking to optimize your store’s performance and you only need the return portal functionality, you can create a custom page and embed the portal directly on it. This setup ensures that the ReturnGO script loads only on the return portal page.
If you are using a custom page for the return portal and want to use features like Shop Now, which require the script to run on all pages, you can use ReturnGO’s app embed extension for those features.