
Return Guard is a legacy plan and is no longer available for new installations.
In order to go live and start offering Return Guard return coverage to customers, you'll need to configure and set up Return Guard.
Return Guard Onboarding
To start using Return Guard, install ReturnGO from Shopify, then:
1. Select the FREE WITH RETURN GUARD plan on the plan selection screen.
2. Click CONTINUE ONBOARDING.

3. Choose the return types you support. A default policy rule will be created for each selected type. You can adjust settings and add more rules later.
4. Click CONTINUE ONBOARDING.

5. Create your first return method. This will create your first default return method, which will use Ship by Return Guard labels.
To create your first default return method, you need to set a return address and restocking location. You can change or add more addresses later in your settings.
When selecting a return address, you can choose either an existing Shopify online inventory location or set a custom address.
6. Click CONTINUE ONBOARDING to proceed.

Note: Check the checkbox to use the selected return address as your restocking location. Uncheck to set a separate location for restocking.
 7. Click FINISH & ACTIVATE PORTAL to activate your return portal. This will redirect you to your eCommerce platform to approve your plan. Return Guard will not be actively offered on your store yet.

8. In your eCommerce platform, click APPROVE to approve your plan, and you will be taken back to your ReturnGO dashboard.
9. The What's Next screen will give you an overview of the remaining steps before you can go live It is recommended to click SCHEDULE AN ONBOARDING CALL to book a session with the ReturnGO team to finalize your Return Guard setup.
These are some of the key actions that the ReturnGO support team will help you complete during your onboarding call:
- Adjust Your Policies & Settings: Set up the return options and policy rules you want to support.
- Test Your Return Portal: Preview the return portal to make sure the flow works correctly.
- Publish Your Return Portal: Add the portal link to your website so customers can easily access it.

After finishing the onboarding wizard, a banner will appear at the top of your dashboard prompting you to complete your Return Guard setup.

Enabling Return Guard
While we recommend contacting support for an onboarding call to get full coverage and maximize your experience with the app, you can start using ReturnGO’s core functionality immediately.
You can book your onboarding call from the Return Guard page of your ReturnGO dashboard, or contact the support team via the in-app chat.
During your onboarding call, the ReturnGO support team will guide you through the steps required to go live with Return Guard, including:
- Enabling access to the Return Guard settings page.
- Enabling Return Guard so it can be offered to customers.
- Enabling the ReturnGO app embed on your online store.
- Customizing your Return Guard settings and content.
- Configuring your return policy rules to use a Ship by Return Guard return method.
- Publishing your return portal.
- Testing the full setup to ensure Return Guard is working correctly in your store.
- Going live with Return Guard and your portal.
Once everything is set up and your portal is live, you can start offering Return Guard to customers in your store.
Adding Return Guard to Your Store
To go live with Return Guard, you need to add it to your storefront so that customers can see and select it while shopping.
To display Return Guard in your store:
- Go to Return Guard.
- Open the Settings section.
- Enable the Offer Return Guard to Customers toggle.
- Click on the save icon to save your changes.

Then, you will need to go to your Shopify Admin and enable the ReturnGO app embed in your theme.
Once both are enabled, check if Return Guard appears in the cart.
If it doesn’t appear in the cart, you’ll need to manually add it using a section block or code snippet. If you want to display Return Guard somewhere other than the cart (such as on a different page), you’ll also need to add it manually.
Note: Before making any changes to your store, it’s recommended to duplicate your current store theme as a backup. This ensures you can safely restore your store if anything goes wrong.
Using App Embeds to Display Return Guard
The recommended and standard way to enable Return Guard in your store is through Shopify’s App Embeds. When the ReturnGO app embed is enabled, the Return Guard coverage widget is automatically injected into cart drawers. The widget is not automatically injected into the cart page. If your store uses a cart page instead of a cart drawer, you must manually add the Return Guard widget using a section block or code snippet.
To add Return Guard to your store using the app embed:
1. Go to Shopify Admin > Online Store > Themes.
Note: If your store is already live, it is recommended to duplicate your live theme first to create a test version of the theme. This enables you to safely test the changes without affecting the live store.

2. Click CUSTOMIZE on the duplicated theme.

3. In the theme editor, click APP EMBEDS.
4. Enable the ReturnGO toggle to activate the Return Guard embed.
5. Click SAVE.

6. Click PREVIEW.

7. Check if Return Guard appears in the cart. If it does not appear automatically, you will need to add it manually.

8. Once you’ve confirmed everything is working correctly, if you were working on a duplicated theme, publish the updated theme to make the changes live in your store.

When Return Guard is enabled in your ReturnGO settings and the ReturnGO app embed is active in your store, the Return Guard product should be automatically detected and added to the cart if your theme supports it.
Using the Return Guard Section Block
If your theme cannot automatically detect Return Guard, or if you prefer to place Return Guard on a different page (outside the cart), you can add it using a Section block via the Shopify theme editor.
Note: First, make sure the ReturnGO App Embed is enabled in your theme editor.
To use a section block:
- Go to Shopify Admin > Online Store > Themes.
- Click CUSTOMIZE on your current or duplicated theme.
- In the theme editor, navigate to the page where you want to add Return Guard.
- Use the left sidebar to choose where on the page you want to add Return Guard, and click ADD SECTION.

- Click on APPS.
- Select RETURN GUARD.

- Position the block on the page.

- Click SAVE.

- Click PREVIEW.

- Make sure Return Guard appears in the section where you added it.

Note: The Section block lets you add Return Guard to any part of any page except the cart.
11. If you were working on a duplicated theme, once you’ve confirmed everything is working correctly, publish the updated theme to make the changes live in your store.

Adding Return Guard Using Code (Manual Setup)
If your theme doesn’t support automatically detecting and displaying Return Guard in the cart, you can manually embed the Return Guard element in your cart by adding a code snippet to your store’s theme code.
Note: You’ll need access to the Shopify theme editor to insert code into your theme files.
To manually embed Return Guard in your theme’s code:
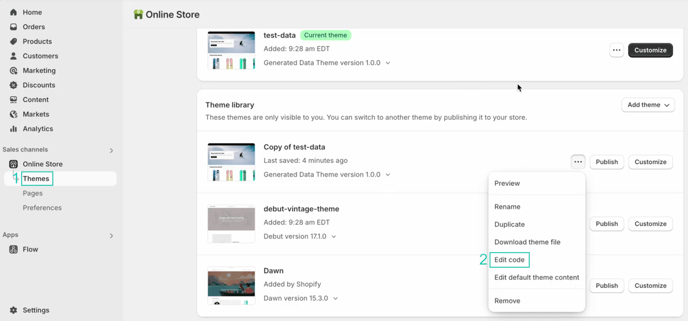
1. Go to Shopify Admin > Online Store > Themes.
2. Click EDIT CODE.
3. In the left-hand sidebar, you’ll need to locate the cart .liquid file in the Snippets section. It may have one of various names, such as:
- cart.liquid
- cart-template.liquid
- main-cart.liquid
- cart-drawer.liquid (if your theme uses a drawer cart)
- Other files with "cart" in the name
4. Open the cart file and locate the section in the code where the checkout button is rendered.
Note: It’s recommended to place Return Guard above the checkout button for the best customer experience.
Use the search feature (Ctrl+F or Cmd+F) and look for keywords such as:
- checkout
- checkout_button
- name="checkout"
- type="submit"
- form
- btn, btn--checkout, or similar class names
5. Insert the following HTML <div> element above the checkout button:
<div class=”returngo-coverage-on-demand”></div>
Note: If you can’t find the checkout button, it might be located in a different cart file. Try checking other cart-related files in your theme, or look for a button with an <input type="submit"> element and paste the embed code above it.
Ideal Placement for Return Guard:
It is recommended to add Return Guard in one of the following locations for the best customer experience:
- Directly above the checkout button: Ensures shoppers see the Return Guard option as they proceed to checkout.
- Below the cart total but before the checkout button: Keeps the flow intuitive while maintaining visibility.
- Inside the same container or wrapper as the checkout button: Helps with alignment and styling consistency.

6. Click SAVE.
7. Click PREVIEW STORE.

8. Check that Return Guard appears correctly in the cart.

9. If you were working on a duplicated theme, once you’ve confirmed everything is working correctly, publish the updated theme to make the changes live in your store.
How to Customize Return Guard Settings
After your onboarding call with the ReturnGO support team, your Return Guard settings will be unlocked.
These settings enable you to configure how return fees are handled for orders covered by Return Guard, and customize the content customers see when Return Guard is offered in your store.
To customize Return Guard configurations:
1. Go to Return Guard.
2. Open the Settings section.
3. Choose how return fees are handled for orders covered by Return Guard:
- Waive all fees: All return fees are waived for covered returns.
- Waive return label fee only: Only the return label fee is waived, while other return fees can still apply.
Note: The cost of Return Guard in your store is set by ReturnGO and cannot be customized.
4. Click on the save icon to save your changes.

How to Customize Return Guard Content
You can customize the content customers see when Return Guard is offered in your store and when they return an item covered by Return Guard in the return portal.
To customize the Return Guard content:
- Go to Return Guard.
- Open the Content section.
- Set the Return Guard description, which is the text that will appear when offering the return coverage option to customers in your store.
Tip: You can use the {Return_Guard_Price} variable in your Return Guard description. This will dynamically add the price of Return Guard coverage in the customer’s currency.

4. Choose how the Return Guard option will be displayed for shoppers to add it to their order:
- Toggle
- Checkbox
5. Set the Learn More Popup Title, which will appear when customers click to learn more about Return Guard.
6. Add the Learn More Popup Content, which provides additional details about Return Guard when customers open the popup.
7. Add a portal title for covered returns. This appears in the return portal when a customer returns an order that is covered by Return Guard.
8. Add a portal explanation for covered returns. This appears in the return portal when a customer returns an order that is covered by Return Guard.
9. Click on the save icon to save your changes.

Customizing Return Guard in Checkout
You can also customize how Return Guard appears to customers at checkout by editing its product name in Shopify. Since Return Guard is added to your Shopify catalog as a product, you can update its product name the same way you would with any other product.
To change the Return Guard product name, go to your Shopify admin and edit the product name directly.
Note: The price of the Return Guard product is set by ReturnGO and cannot be customized.

Setting Up Return Methods and Policy Rules for Return Guard
To ensure Return Guard works correctly, you need to configure your return methods and policy rules accordingly. Ensure that you use return methods where the Connection is set to Ship by Return Guard, and make sure your policy rules are configured to use those return methods.
To configure your return methods and policy rules for Return Guard:
1. Go to Settings > Return Methods.
2. Open the Ship with pre-paid label section.

You will see two return method types: Ship by ReturnGO and Ship with Return Guard. This may be confusing, so it is important to understand the difference:
- Ship by ReturnGO is ReturnGO's standard built-in return shipping solution for regular subscription plans. However, it cannot be used for Return Guard. Only the Return Guard method can be used for waiving fees for covered returns and charging customers for uncovered returns.
- Ship by Return Guard is the Return Guard return method. This is the only method through which ReturnGO recognizes the customer’s coverage status and covers the cost of covered returns as needed. You must use this method for all returns, both covered and uncovered, to ensure Return Guard is applied correctly.

3. Click on the Ship by Return Guard return method.

4. Open the Shipping Label Settings section.
5. Ensure that Connection is set to Ship with Return Guard.

6. Review and complete the rest of the return method settings, including:
- Shipping Label Settings
- Return Address and Restocking Location
- Shipping Instructions
7. Click on the save icon to save your changes.

Note: With Ship with Return Guard, you cannot select a specific carrier or service level. ReturnGO automatically assigns the lowest-cost available label, as ReturnGO pays for the label when Return Guard has been purchased.
You can set up multiple Ship by Return Guard return methods with different settings, such as return locations, etc, as needed.
Configuring Policy Rules for Return Guard
Once the correct return method is set up, ensure all policy rules are configured to use the Ship by Return Guard return method.
To configure your policy rules:
- Go to Settings > Return Policy.
- Click EXPAND ALL.
- Click the pencil icon on the right of the policy rule to configure an existing policy rule.
Optional: Click ADD RULE to create a new one.
- Open the Details section.
- Set the Return Method to Ship by Return Guard.
- Enable the Activate Policy Rule toggle to offer this policy rule on the portal.
- Click on the save icon to save your changes.

This ensures that all returns are handled correctly, Return Guard coverage is applied as expected, customers receive free shipping on covered returns, ReturnGO covers the cost of eligible returns, and customers are charged for uncovered returns.
Switching from Return Guard to a Different Plan
If you decide to switch from the Return Guard plan to another ReturnGO plan, you will automatically receive a 14-day free trial for that plan.
Ship by Return Guard is only available on the Return Guard plan. If you switch to a different plan, you'll need to update any return methods using Ship by Return Guard to use a different shipping connection.
Note: Switching to a different plan does not automatically remove the Return Guard product from your store. It’s recommended to manually remove it from your Shopify catalog when switching plans.
To update your return methods:
- Go to the Settings > Return Methods.
- Open the Ship with pre-paid label section.
- Select a return method to edit.

- Open the Shipping Label Settings section.
- Set the Connection to Ship by ReturnGO.
Note: If you're on a Premium plan or higher, you can select a different shipping integration and connect to your preferred carrier/service level.
6. Select a carrier/service level.

7. Click on the save icon to save your changes.

Your return policy rules are linked to your return methods, so if you update a return method’s shipping connection, any policy rules using that return method will continue to work properly. Just make sure that all your policy rules are using supported return methods.
Note: To use the free Return Guard plan, you must offer Return Guard on your store. If Return Guard is not enabled, you won’t be able to use ReturnGO. To continue using ReturnGO without offering Return Guard, you’ll need to switch to a paid plan.
Switching from a Different Plan to Return Guard
If you want to switch to the Return Guard Plan from a paid plan, you must contact ReturnGO Support to make the switch for you.
Once moved to the Return Guard plan, you will need to complete a Return Guard onboarding call to gain access to the relevant settings and complete the necessary setup to go live with Return Guard.
After the switch, you must configure all your return methods and policy rules to use Ship by Return Guard.
Any previously connected shipping integrations will be disconnected as part of the transition to the Return Guard plan, which does not support shipping integrations. You will need to update any return methods that use pre-paid labels to use the Ship by Return Guard connection instead of the previously used shipping integration.
If your return portal is already live, make sure your return methods and policy rules are configured correctly as quickly as possible to make sure customers don’t have any issues submitting returns.
Tip: Return Guard return methods and policy rules apply to all returns, both covered and uncovered by Return Guard. This means you can seamlessly continue to accept returns for orders placed before Return Guard was enabled. They will simply be processed as uncovered returns.