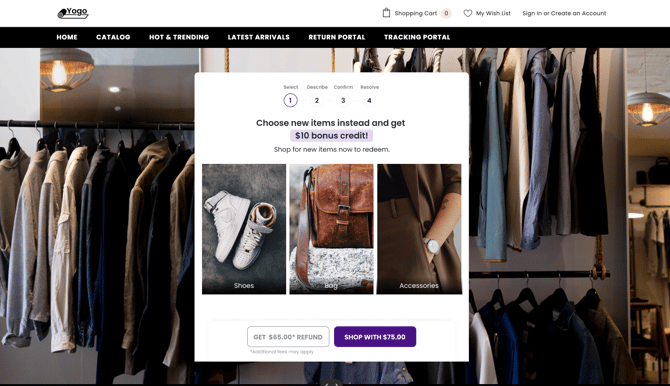
The Shop Now feature lets customers use the value of their returned items as credits to shop for new items directly in your store. They can select multiple items, pay the difference if necessary, and complete the exchange in a seamless shopping experience.
Requirements
Premium plan or above.
-
A store with an active ReturnGO integration.
Limitations
-
Shop Now doesn't support items with compare-at-price discounts or promotions during exchanges.
- When using the Shop Now feature, some exchange calculation options are automatically disabled, including:
Capabilities
-
Customers can add additional items beyond their exchange credit and pay the difference.
-
The Shop Now Switch to Exchange page can be customized to display marketing banners, collections, or special offers, and incentives can be added.
-
The floating widget updates exchange credits in real-time as customers add or remove items.
-
Discounts, gift cards, and changes made to the cart are accurately reflected when returning back to the portal.
- Customers can apply a new discount code during an exchange.
-
The widget is semi-transparent, and draggable so as not to obstruct any key information.
-
The widget supports any language and currency.
How It Works
The Shop Now feature enhances the exchange process, allowing customers to use credits that represent the value of their returned items to shop for new products. They can browse your store, add items to their cart, and complete purchases using their exchange credits.
Shop Now uses the any to any exchange flow to let customers use their return balance as exchange credits.
Note: Exchange orders created through Shop Now are processed the same way as regular exchange orders in Shopify and are reflected as new sales in your gross sales reporting.
The customer flow is as follows:
-
Customers select a product exchange or switch to an exchange.
-
If the customer chooses to exchange at least one item, they are automatically redirected to your store with a floating widget displaying their available exchange credits.

-
They can add as many items as they want, with the widget updating in real-time to show their current credits.
-
After selecting the new items they want, customers are redirected back to the ReturnGO portal to complete the request and pay the difference if the total value of the new items exceeds the available credits.
-
Like with any exchange via ReturnGO, customers can pay for price differences and fees directly in the portal if you have portal checkout enabled. Otherwise, customers will receive an invoice from the eCommerce platform.
-
Shop Now for Multiple Markets
Shop Now supports stores with multiple markets or languages as long as they are configured under a single domain using subdirectories (e.g., /es/, /fr/).
For example, if a customer is browsing the French market at yourstore.com/fr/, Shop Now will correctly preserve the /fr/ path during redirection to the product page and back to the portal.
Shop Now does not support multiple domains in a single portal setup. For example, if your store uses separate domains for each market (e.g., yourstore.fr, yourstore.de), Shop Now will not be able to redirect to the correct domain.
Configuring the Shop Now Feature
1. Go to Settings > General.
2. Open the Exchanges section.

3. Enable the Shop Now toggle.
4. Click on the save icon to save your changes.

5. For Shopify stores, enable the ReturnGO app embed in your Shopify store to make sure ReturnGO can run its script on all your store’s pages.
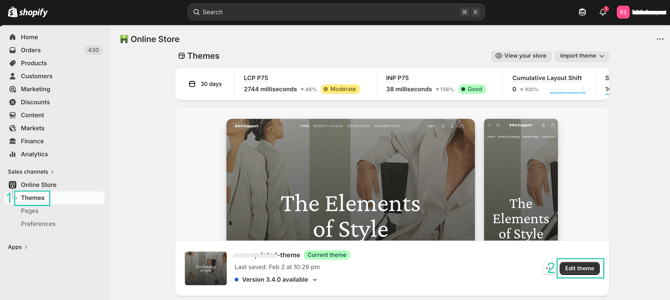
Enabling The ReturnGO App Embed In Shopify
To enable the ReturnGO app embed in Shopify:
-
Go to Shopify admin > Online Store > Themes.
-
Click EDIT THEME.
-
Click App embeds icon in the left sidebar.
-
Enable ReturnGO app toggle.
-
Click SAVE.

Test Shop Now in Preview Mode
You can test Shop Now without generating a real RMA by clicking on the preview link in the Shop Now settings or going to:
[your-return-portal-url]?exchangeInStore=1
This enables preview mode for the exchange-in-store flow.
To test:
-
Ensure there is a product exchange policy rule set up in the system, and verify that product exchange can be selected in the portal.
-
After all return reasons have been selected, verify that you are redirected to the store.
-
Confirm that the floating widget appears on the page and shows the number of exchange credits available for use.
-
Attempt to proceed to checkout, either through your site or via the widget. Verify that instead of being sent to Shopify’s checkout, you are redirected back to the portal.
-
If any issue arises during these stages, you'll need to manually configure the relevant part of Shop Now (or all of it) to ensure the feature works correctly.
Switch to Exchange
It is recommended to enable Switch to Exchange as an enhancement to Shop Now, encouraging customers to shop now for new items instead of getting a refund.
You can customize the Switch to Exchange page to match your brand and highlight any incentives you’re offering to drive more exchanges, reduce refunds, and retain more revenue.
Fraud Prevention
To protect against fraud and abuse, customers identified as high-risk by ReturnGO's ReturnScore (based on return history and other criteria) are ineligible for Switch to Exchange incentives.
To prevent customers from repeatedly returning items solely to receive the bonus credit, high-risk customers will not receive an incentive for switching to an exchange. While Switch to Exchange will still be offered, high-risk customers will not be eligible for the incentive.
Note: This is not configurable at this time.
It’s important to note that ineligibility for the incentive is rare and reserved for extreme cases.
Shop Now for Magento Stores
To enable Shop Now on Magento, you'll need to install a plugin on Magento. The plugin file will be provided by the ReturnGO team for installation in your Magento store.
To install Shop Now via the plugin:
- Unzip the plugin file in the app/code folder of your Magento Store.
- From the root of Magento, run
bin/magento module:enable ReturnGo_ShopNow - Run
bin/magento setup:upgrade - Run
bin/magento cache:flush
All other settings and configurations are not specific to Magento and are as listed in this article.
Shop Now for BigCommerce Stores
To enable Shop Now on BigCommerce, contact the ReturnGO team to enable it for you.
Once enabled, you need to manually add the required HTML and JavaScript, as outlined in the Advanced Configuration section below, to the relevant storefront pages to ensure the widget appears and functions correctly.
All other settings and configurations are not specific to BigCommerce and are as listed in this article.
Shop Now for SFCC Stores
To enable Shop Now on a Salesforce Commerce Cloud (SFCC) store, follow the Shop Now instructions included in the SFCC cartridge used to connect ReturnGO to SFCC.
Advanced Configuration
Complete manual setup is required if you are using a custom platform or Liquid.
For stores using Liquid themes, you may need to configure additional attributes for buttons or forms that interact with cart updates or checkout redirection.
Adding Attributes to Buttons and Forms
If cart updates or checkout redirections are not being captured, you can manually add specific data-returgo attributes to your HTML elements:
There are two key attributes you can add to the following buttons or forms:
- data-returgo-shop-now-click – Captures click events on buttons or links.
- data-returgo-shop-now-submit – Captures form submission events.
Each attribute supports the following values based on the action you want to trigger:
- "cart-update" – Synchronizes the cart and updates the Shop Now overlay widget.
- "checkout" – Redirects the user to the return portal to continue with the return process.
- "buy-now" – Triggers the “Buy it Now” action (clears cart + adds the current product to cart + redirects to portal).
To capture click events on buttons, use the following format: data-returgo-shop-now-click.
To capture form submission events, use the following format: data-returgo-shop-now-submit.
Example HTML
<!-- To capture click events on buttons -->

<button data-returgo-shop-now-click="cart-update">Add to Cart</button>

<button data-returgo-shop-now-click="checkout">Go to Checkout</button>

<!-- To capture form submission events -->

<form data-returgo-shop-now-submit="cart-update">

  <input type="submit" value="Update Cart">

</form>

<form data-returgo-shop-now-submit="checkout">

  <input type="submit" value="Proceed to Checkout">

</form>
Using JavaScript to Perform Actions
If your store uses JavaScript for cart updates or checkout redirections, you can trigger these actions programmatically with the following globally available functions:
Cart Synchronization:
To update the Shop Now overlay and synchronize the cart, call:
window.returnGoShopNow.handleCartUpdate(e?: Event);
Checkout Redirection:
To redirect the user to the return portal, call:
window.returnGoShopNow.handleCheckout(e?: Event);
Note: These functions are only available on window.returnGoShopNow when the Shop Now flow is active. To safely call these methods in your script, ensure that they exist before invoking them.
Example
if (typeof window.returnGoShopNow.handleCheckout !== "undefined") {

  window.returnGoShopNow.handleCheckout(e);

}

if (typeof window.returnGoShopNow.handleCartUpdate !== "undefined") {

  window.returnGoShopNow.handleCartUpdate(e);

}
Troubleshooting For Regular Shopify Stores
For regular Shopify stores, if only one step is not functioning correctly, you can configure just that specific step.
Depending on the issue—whether it’s related to redirecting to checkout or updating the cart—you’ll need to add the relevant attribute to your store.
Widget Not Appearing
If the widget is not appearing, this indicates that the ReturnGO script is not running on all your pages. In this case:
- Your store may be blocking the script.
- Make sure ReturnGO’s app embed is enabled through Shopify’s theme customization.
- Try disabling and re-enabling the Shopify integration toggle on the Integrations > Products & Services page.
Headless Stores (Hydrogen)
If your Shopify store is Hydrogen-based, the following additional steps need to be taken before Shop Now exchanges can be enabled for your store.
Note: These instructions are only relevant if the regular Shop Now settings don't work to enable the feature on your store.
You’ll need to include the ReturnGO script on all pages by creating a React component that loads the script. Then, you'll include this component in your root.jsx file or a page template shared across all pages.
To enable the Shop Now feature on Hydrogen-based stores:
- In your Hydrogen theme app, create a new component file (e.g. ReturnGoScript.jsx)
- Paste this sample code, which will load the ReturnGO script: Example:
import { useEffect } from "react";

import { useLoadScript } from "@shopify/hydrogen";

export default function ReturnGoScript() {

    // Load the ReturnGO script

    useLoadScript('https://static.returngo.ai/master.returngo.ai/returngo.min.js?shop=example.myshopify.com');

    useEffect(() => {

        // Configure the ReturnGO object

        window.returnGoCanBeRun = true;

        window.ReturnGO = {

            shop: 'example.myshopify.com', // Replace with your shop URL (without https://)

            currency: {

                active: 'USD', // Portal currency

                rate: '1.0', // Conversion rate between portal and store currencies (if different)

            },

            locale: 'en', // Display locale

        };

    }, []);

    return null;

} - Search for root.jsx or a common page template.
- Include the new component in the template by pasting it into your your root.jsx file, just after the <Scripts /> tag, or in any page template that is shared across all pages.
Embed the Return Portal into a Custom Page (Optional)
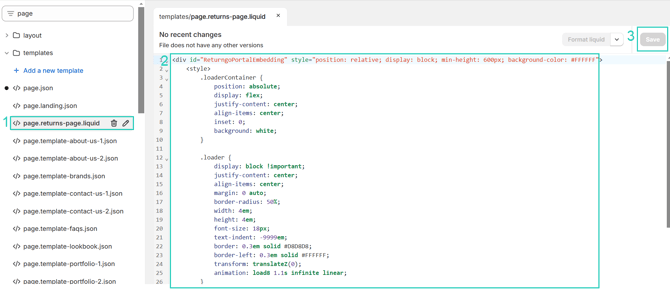
To embed the return portal in a custom page:
- In the code editor, click on the template for your custom returns page where you want to embed the portal.
- Paste the following HTML structure to embed the return portal on the page:
<div id="ReturngoPortalEmbedding" style="position: relative; display: block; min-height: 600px; background-color: #FFFFFF">

    <style>

        .loaderContainer {

            position: absolute;

            display: flex;

            justify-content: center;

            align-items: center;

            inset: 0;

            background: white;

        }

        .loader {

            display: block !important;

            justify-content: center;

            align-items: center;

            margin: 0 auto;

            border-radius: 50%;

            width: 4em;

            height: 4em;

            font-size: 18px;

            text-indent: -9999em;

            border: 0.3em solid #D8D8D8;

            border-left: 0.3em solid #FFFFFF;

            transform: translateZ(0);

            animation: load8 1.1s infinite linear;

        }

        @keyframes load8 {

            0% {

                transform: rotate(0deg);

            }

            100% {

                transform: rotate(360deg);

            }

        }

    </style>

    <div class="loaderContainer">

        <div class="loader"></div>

    </div>

</div> - Click SAVE.
Troubleshooting for Headless Stores
- Content Security Policy (CSP) Errors
If you're encountering errors where the ReturnGO script cannot be loaded or requests are blocked, it's likely due to CSP restrictions. You will need to update your CSP settings to allow ReturnGO resources.
In your root.jsx, locate the createContentSecurityPolicy call, and add https://static.returngo.ai to both the connect-src and script-src directives.
- Styles and Fonts Not Loading
If styles or fonts are not loading properly, it's likely due to CSP restrictions. To fix this:
- Add 'unsafe-inline' to the style-src directive.
- Allow font and stylesheet resources from Google by adding https://fonts.googleapis.com/ to connect-srcand https://fonts.gstatic.com to font-src.
The updated CSP configuration should look like this:
const { nonce, header, NonceProvider } = createContentSecurityPolicy({
    shop: {
        checkoutDomain: context.env.PUBLIC_CHECKOUT_DOMAIN,
        storeDomain: context.env.PUBLIC_STORE_DOMAIN,
    },
    scriptSrc: [
        "'self'",
        "https://cdn.shopify.com",
        "https://shopify.com",
        "https://static.returngo.ai"
    ],
    styleSrc: [
        "'self'",
        "'unsafe-inline'",
        "https://cdn.shopify.com",
        "https://fonts.googleapis.com/"
    ],
    connectSrc: [
        "https://static.returngo.ai",
        "https://fonts.googleapis.com"
    ],
    fontSrc: [
        "https://fonts.gstatic.com"
    ]
});
For any other issues, feel free to contact ReturnGO support through chat or email.