Product exchanges enable customers to perform product exchanges by using the value of their returned items as exchange credits to select any number of new products. This differs from traditional one-for-one exchanges by enabling customers to choose multiple new items instead of being limited to a single replacement item.
With product exchanges, customers can select multiple new items, pay the difference if needed, or receive a refund if the total is lower.
This feature is perfect for boosting upsell opportunities and offering a more flexible exchange experience.
Requirements
-
Shop Now
As of April 27, 2025, Shop Now exchanges are now the standard exchange flow for all ReturnGO merchants with Product Exchange in their plan.
If you're not seeing the Shop Now exchanges flow in your account and would like access, please contact support.
Limitations
Shop Now exchanges don't support the following:
- Buy X Get Y (BxGy) discounts
- Compare-at-price discounts or promotions
- Free variant exchange range setting
- This setting only applies to variant exchanges, not to product exchanges, as there is no one-to-one price difference calculation in product exchanges
If you are using BxGy or a custom exchange flow and want to enable Shop Now exchange, please contact ReturnGO support for manual activation.
How Product Exchanges Work
The product exchange flow works in the following way: Customers can select any number of new items using the value of their returned items as exchange credits.
Here’s how the exchange flow works:
- Customers select the items they wish to return.

- Customers choose a return reason, answer follow-up questions, and upload images/videos if required.

- Customers select the resolution they want.

- If the customer requested a product exchange or opted to switch to an exchange, they are automatically redirected to your store with a floating widget displaying their available exchange credits. Customers can then use their available exchange credits to select any number of new items. The customer will need to:
- Select new items in your store.
- After selecting the new items they want, customers are redirected back to the ReturnGO portal to complete the request and pay the difference if the total value of the new items exceeds the available credits.

- The customer will receive a refund for the remaining credits or pay the balance if the new selection exceeds the available credits.
How to Configure Product Exchanges
There are many settings that you can configure to manage how product exchanges will work in your returns process. The default settings work in most cases.
Note: Before configuring, ensure Shop Now is enabled.
To configure product exchanges:
- Go to Settings > Resolutions.
- Open the Exchange Resolutions section.
- Click on a PRODUCT EXCHANGE resolution.
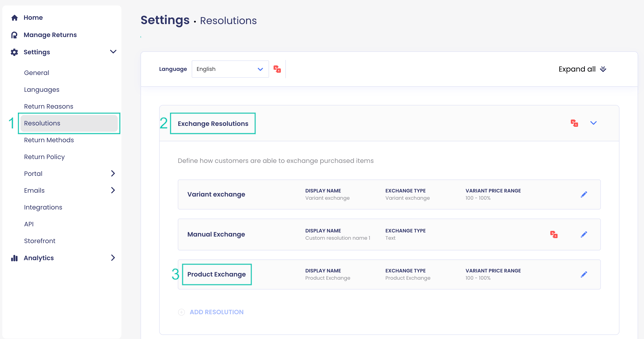
- Open the Details section to edit it.
- Set an internal name, which will only be visible to you, not your customers.
- Set a display name, which your customers will see when selecting this resolution on the return portal.
- Edit the description in the Display Description field. This displays additional details of this resolution in your return portal.

8. Open the Stock section.
9. Select Allow out-of-stock exchange to allow customers to select out-of-stock variants.
10. Set a Minimum available stock threshold.
11. Select how the customer will receive a refund for a price difference in the Refund By setting:
-
Original Payment Method: The refund is issued to the payment method used for the original order.
- New Gift Card: Customers are notified that the refund will be issued as store credit, and the refund pop-up is automatically set to New gift card.
- New Store Credit: Customers are notified that the refund will be issued as store credit, and the refund pop-up is automatically set to New gift card.
12. Add a link to the size chart you want to show customers when selecting a new product.
13. Add a size variant option name to display the size chart URL only for this type of variant (i.e, size, color).

14. Open the Shipping section.
15. Configure how shipping is handled when creating new exchange orders.
16. Click on the save icon to save your changes.

You can then use this resolution to build your return policy in your return policy settings, where you can configure additional settings such as eligibility rules, fees, and more.
Switch to Exchange
The new version of Switch to Exchange is part of the product exchange flow, which is calculated based on the total return value. This means customers are encouraged to switch from a refund to an exchange on the overall return level instead of per item.

Exchange Credits Calculation
The available exchange credits customers will see in the portal are calculated based on the total value of the returned items and adjusted according to any additional items, bonuses, or fees.
The calculation follows this formula:
Exchange Credits =
+ Returned items value
+ Exchanged items value
+ Bonuses
- Fees
- New items selected so far
- Reduced refunds
The following factors are taken into account in the exchange credits calculation:
Returned Items Value: The value of the items the customer requested to return for a refund.
Exchanged Items Value: The value of the items the customer requested to exchange for a new item (whether variant or product).
Bonuses: Any exchange-related bonus credits the customer is eligible for.
Fees: Any applicable exchange-related fees.
New Items Selected: The value of any new items already selected in variant exchanges.
Reduced Refunds: Any reductions to the refund amounts.
How Product Exchanges Appear on the RMA Page
When a customer submits a product exchange request, the new items selected by the customer will appear in the New Items section of the RMA page.
Note: New items are not associated with specific returned items.
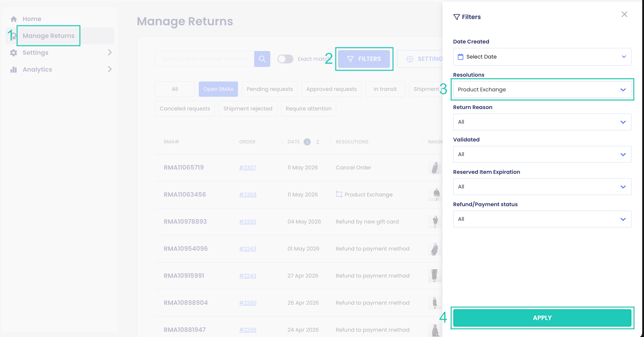
To view the new items selected by a customer in a product exchange:
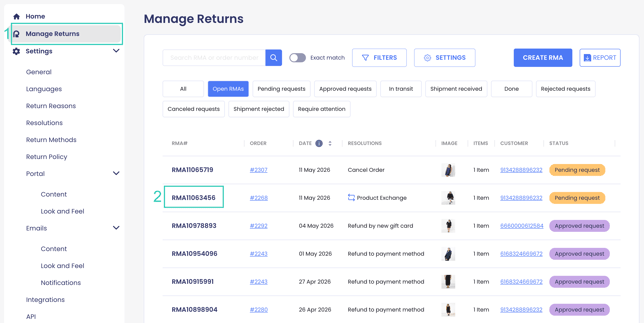
- Go to Manage Returns.
- Search for a specific RMA or filter by resolution.
- To view only Product Exchanges, select Product Exchange in the Resolutions filter.
- Click APPLY.
- Click on the RMA you want to open.

- Open the New Items section to view the new products the customer selected.

Note: To track new revenue from upsells during exchanges, you can view the new revenue in the RMA details, return analytics, and it will also appear in your store reports.
Applying Fees on Product Exchanges
Stores on all platforms can use portal checkout to charge fees and price differences directly in the portal.
Shopify stores can instead trigger Shopify to email invoices to the customer for the fees and price difference charges, and they'll pay them on Shopify.
Note: Price differences/fees must be paid before the exchange can be approved.

Price Differences Resulting in a Refund or a Charge
If the price difference results in a refund, you can use REFUND/CREDIT on the RMA page to issue the refund.
If the price difference results in an additional charge, you can use RELEASE EXCHANGE on the RMA page to send an invoice to the customer. Alternatively, you can use the Portal Checkout feature to have the customers pay any fees and price differences directly in the portal.

You can specify whether paid amounts will be applied to new items in exchange draft orders per item, as item-level discounts, or for the whole order, as an order-level discount.
Example: One Item Exchanged for Two
Let’s say a customer purchased a dress for $149 and initiated a return using the Shop Now exchange flow. The customer chooses to exchange it for the following two items:
- Coat: $89
- Jacket: $89
Here’s how the flow works for the customer:
- The customer selects the dress for return and chooses the Product Exchange resolution.
- They are taken to the product exchange page, where they can browse and select new items using their $149 exchange credit.
- They add both the coat and jacket to their cart, totaling $178.
- At checkout, the customer sees that they’re using their $149 exchange credit and are prompted to pay an additional $29 to complete the exchange.
On the backend, in the RMA page:
- The Original Items section will show the dress as the item being returned.
- The New Items section will display the coat and jacket as the exchanged items.
- The system will not trigger a refund because the new item total exceeded the exchange credit, resulting in an upsell of $29.

Example: Two Items Exchanged for One
Let’s say a customer purchased a sweater for $59 and jeans for $69, and initiated an exchange. The customer chooses to exchange them for:
- Winter Coat: $109
Here’s how the flow works for the customer:
- The customer selects to return both the jacket and the dress and chooses the Product Exchange option.
- They are taken to the product exchange page with a combined exchange credit of $218.
- They add the shirt to their cart, totaling $79.
- At checkout, the customer sees that they’re using $79 of their $218 exchange credit.
- The remaining $139 is refunded to the customer..
On the backend, in the RMA page:
- The Original Items section will show the jacket and the dress as the items being returned.
- The New Items section will display the shirt as the new item.
- The system will issue a refund of $139 for the unused credits.

Refund Calculation in Upsell Cases
Refunds in product exchanges follow a consistent calculation logic:
- Returned items are refunded at the paid price (the amount the customer originally paid).
- Exchanged items are calculated at the catalog price (the current store price).
- In upsell cases, the refund amount remains the same before and after the upsell.
Example: Upsell Refund Calculation
A shopper originally purchased 3 items for a total of $40 and requests an exchange.
Here’s how the balance changes step by step:
- The shopper selects a new item that costs $40. This deducts $40 from the balance (balance: -$40).
- Item 3 is exchanged and valued at its catalog price of $30. This adds $30 to the balance (balance: -$10).
- Item 1 is returned and refunded at its paid price of $10. This adds $10 to the balance (balance: $0).
- Item 2 is returned and refunded at its paid price of $12. This adds $12 to the balance (balance: $12).
Final refund: $12
Allow Exchanged Items to be Returned
You can enable previously exchanged items to be returned. Resolutions will be offered based on your configured policy rules.
To enable exchanged items to be returned:
- Go to Settings > General.
- Open the Exchanges section.
- Enable the Allow Exchanged Items to be Returned toggle.
- Click on the save icon to save your changes.

Note: When disabled, previously exchanged items cannot be returned in any form.
Forward Shipping Rates in Exchange Orders
As part of the exchange process, ReturnGO creates a draft order in your store with the customer’s shipping address. On the resolutions page, you can configure the Exchange order shipping setting to define how shipping rates are applied to exchange orders.

- Use any existing free shipping rate: ReturnGO will automatically apply the first available free shipping option from your store. If no free shipping option is available, the shipping field will remain blank, and you’ll need to set it manually.
- Select shipping rate manually: No shipping option is applied by default. You’ll need to choose a shipping rate directly in your eCommerce platform while the exchange order is in draft status.
- Create custom free shipping rate: A specific free shipping rate will be created and applied to all new exchange orders. You will need to enter a name for this custom free shipping option.
- Always use one selected shipping rate: A specific existing free shipping rate will always be applied by name to all exchange orders. You will need to enter the shipping rate name and define a fallback behavior in case the selected rate is not found. The fallback can either leave the shipping rate blank for manual selection or automatically create and apply a custom free shipping rate with the same name.
Note: The Exchange order shipping setting does not currently apply to manual exchanges.
Manually Apply a Shipping Rate
If you select the manual shipping rate option, you’ll need to assign a shipping method to the draft order in your eCommerce platform while it is still in draft status.
To manually apply a shipping method:
- Go to Manage Returns.
- Click on the relevant RMA.
- Open the Payments & Exchanges section.
- Click the order number, and this will redirect you to the associated draft order in your eCommerce platform.

- Click on Edit shipping or delivery in the draft order.
Note: These steps apply to Shopify. If you are using a different eCommerce platform, the steps for accessing and editing a draft order may vary depending on that platform.

6. Set the Shipping rates and delivery options.
7. Click DONE.

Note: The shipping method must be applied while the order is still in draft status, before it is released and fulfilled.
FAQs
Why don’t I see the replacement item next to the returned item on the RMA page?
- In the product exchange flow, new items are selected using the total exchange credits. As a result, the new items appear in a separate section on the RMA page, instead of being linked directly to individual returned items.
Why is the Free Exchange Range setting no longer showing?
- The Free Variant Exchange Range setting is no longer relevant for product exchanges. The setting was designed to waive price differences within a specified range for one-to-one exchanges. Since with product exchanges, there's no individual item price difference to apply the range to, this setting is not relevant for product exchanges. It is still available for variant exchanges, which are one-to-one exchanges.
Why don’t I have the Shop Now exchange flow yet?
- If you are using BxGy or other custom configurations, your store may not be eligible for automatic migration. Please contact support to request access.
Can customers choose both refunds and exchanges in one return?
- Yes, customers can choose both refunds and exchanges in the same RMA. If at least one item is selected for exchange, they will be directed to the product exchange screen to select new items. If they don’t use all their exchange credits, any remaining amount will be refunded to them.