Getting started with ReturnGO is simple—this guide will walk you through the onboarding process, from installation to account setup, so you can start managing returns seamlessly.
Install ReturnGO
Before setting up your account, you’ll need to install ReturnGO on your eCommerce platform.
- Installing ReturnGO on Shopify
- Installing ReturnGO on Magento 2
- Installing ReturnGO on BigCommerce
- Installing ReturnGO on Salesforce Commerce Cloud
- Installing ReturnGO on WooCommerce
- Installing ReturnGO for Custom Platforms
If you are on an Enterprise or non-Shopify plan, please talk to your onboarding manager regarding implementation.
Account Setup Checklist
Once you’ve installed ReturnGO and selected your subscription plan, you need to set up your account in order to be able to start processing returns with ReturnGO.
Here's a quick checklist of what you’ll need to configure before going live:
- Set up return methods - define how customers can return items.
- Set up your return resolutions - outline what kinds of returns you offer.
- Define your return policy - set your return policy eligibility and different scenarios.
- Integrate your return portal into your store - add your return portal to your online store.
Need help? Schedule a one-on-one onboarding session with a support agent.
General Onboarding
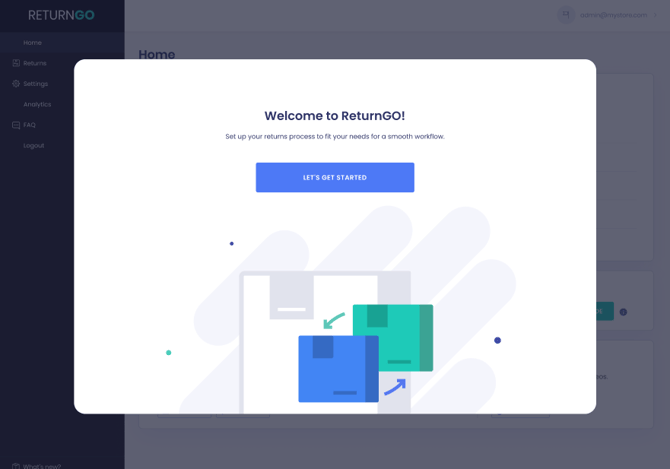
When installing ReturnGO on Shopify, an onboarding wizard will take you step by step through setting up ReturnGO’s core return management system and configuring return types and methods.
Note: This onboarding flow is currently only applicable to ReturnGO merchants who install ReturnGO through the Shopify app store.
To set up ReturnGO:
- Install ReturnGO from the Shopify app store.
- Click LET’s GET STARTED.
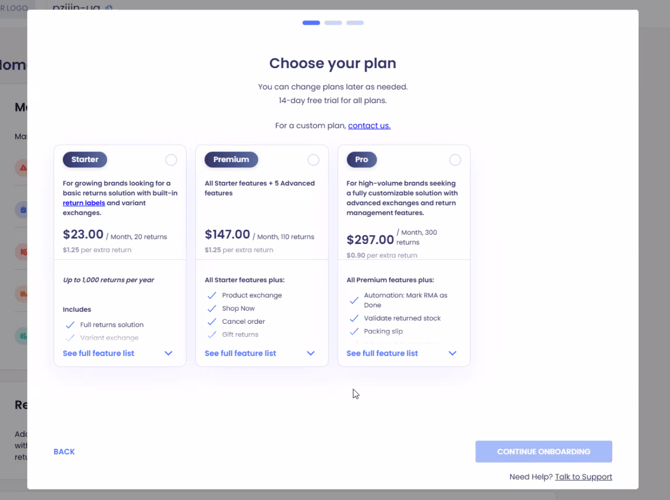
- Select a plan.
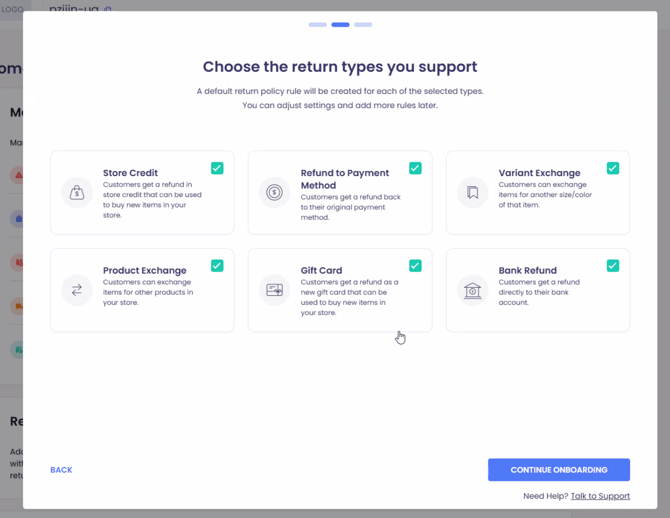
- Choose the return types you support. A default policy rule will be created for each selected type. You can adjust settings and add more rules later.
- After selecting the return types, click CONTINUE ONBOARDING to proceed.
- Create your first return method. This will create your first default return method, which will use ReturnGO labels.
To create your first default return method, you need to choose a return address. You can change or add more return addresses later in your settings.
When selecting a return address, you can choose either an existing Shopify online inventory location or set a custom address.
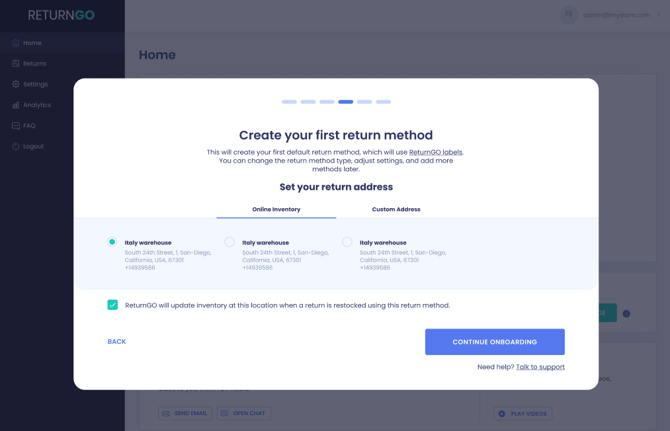
Note: Check the checkbox to use the selected return address as your restocking location. Uncheck to set a separate location for restocking.
- Click CONTINUE ONBOARDING to save your settings and proceed to the next step.

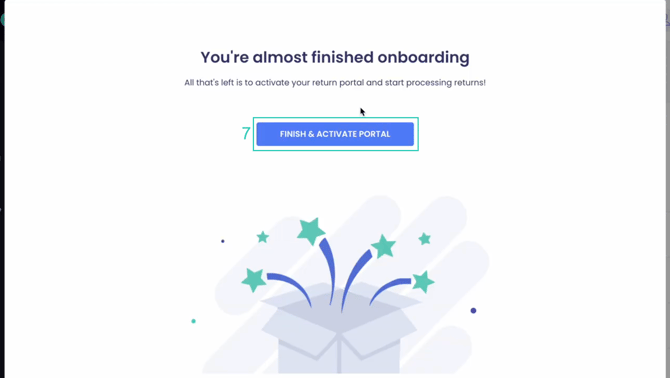
7. Click FINISH & ACTIVATE PORTAL to activate your return portal. This will redirect you to your eCommerce platform to approve your plan.
8. In your eCommerce platform, click APPROVE to approve your plan, and then you will be taken back to your ReturnGO dashboard.
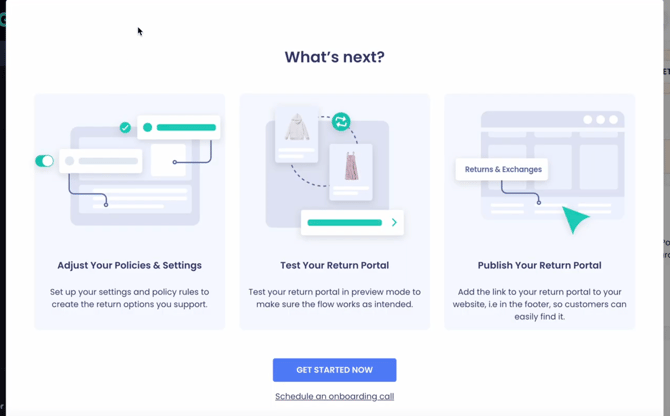
9. The What's Next screen will give you an overview of the remaining steps before you can go live, including:
- Adjust Your Policies & Settings: Set up the return options and policy rules you want to support.
- Test Your Return Portal: Preview the return portal to make sure the flow works correctly.
- Publish Your Return Portal: Add the portal link to your website so customers can easily access it.
10. Once you’ve completed the onboarding wizard, it is recommended to schedule an onboarding call with the ReturnGO support team to help you finalize your setup, configure your return policy, and test the return process to ensure everything is ready.
Launching Your ReturnGO Portal
After completing all the steps, you can finish up your account setup by launching your ReturnGO portal.
To add your ReturnGO portal to your online store:
- Copy the link to your return portal.
- Place your return portal link as a hyperlink in your store footer, return policy page, on your product pages, or anywhere on your eCommerce site.

- You can also test your portal by clicking the PREVIEW MODE button.

Once you’ve set up your account, you can start managing your returns.
Managing Your ReturnGO Subscription
You can manage your current subscription from the Subscriptions Plan page of your account. Here's how to manage your subscription:
- Manage your ReturnGO subscription plan - You can manage and adjust your subscription plan through the Subscriptions Plan page.
- ReturnGO billing and payment - View your billing history and track your usage.
- Enable add-ons - Add specific features to your plan as add-ons on the Account Settings page.
Troubleshooting
If you encounter any issues during onboarding or have trouble setting up your settings and policies, feel free to contact ReturnGO Support through chat or email.
For more personalized help, you can book an onboarding call from the Home page in your ReturnGO dashboard and a ReturnGO expert will help you get set up.